Zach的博客

这个人很懒,都不知道说些什么 :(


  • 首页

  • 分类

  • 关于

  • 归档

  • 标签
Zach的博客

Cell和RefCell

| 阅读次数

Mutability

在Rust中,如果我们这样操作一个变量:

1
2
let x = 5;
x = 6; // error

我们就会得到一个编译错误。

如果要更改一个变量,我们需要添加mut关键字:

1
2
let mut x = 5;
x = 6;

我们也可以像下面一样更改一个变量的值:

1
2
3
let mut x = 5;
let y = &mut x;
*y = 4;

注意到y是可变变量x的可变引用,所以我们可以y来更改x的值,但是我们并不能更改y,在这里只有x是可变的。

Interior Mutability & Exterior Mutability

考虑下面一个例子:

1
2
3
4
use std::sync::Arc;

let x = Arc::new(5);
let y = x.clone();

当clone函数被调用后,Arc<T>会增加它的引用计数,这咋一看和x是不可变的变量矛盾了不是吗?在这里,Arc<T>暴露在用户面前的是不可变的,但是其内部却是可以改变的,因为它使用了RefCell。标准库对Cell和RefCell的定义如下:

1
Values of the Cell<T> and RefCell<T> types may be mutated through shared references (i.e. the common &T type), whereas most Rust types can only be mutated through unique (&mut T) references. We say that Cell<T> and RefCell<T> provide 'interior mutability', in contrast with typical Rust types that exhibit 'inherited mutability'.

也就是说我们可以像这样操作变量:

1
2
3
4
5
use std::cell::RefCell;

let x = RefCell::new(42);
*x.borrow_mut() = 7;
assert_eq!(*x.borrow_mut(), 7);

borrow_mut将变量内部的可变借给了用户,这样我们就可以修改x的值了。还记得Rust的借用规则吗?我们说Rust的一个变量可以有多个不可变的借用,但是有且仅有一个可变的借用,所以如果我们这样操作:

1
2
3
4
5
6
use std::cell::RefCell;

let x = RefCell::new(42);

let y = x.borrow_mut();
let z = x.borrow_mut();

那么这段代码就会在运行时崩溃(panic in runtime),这也说明了一点:RefCell在运行时执行了Rust的借用规则。

RefCell和Cell 的区别在于,Cell只能用于那么实现了CopyTrait的类型,其余的类型使用RefCell,RefCell让程序在修改变量时必须先获得一个写锁。

Cell和RefCell的运用

如果我们自定义了一个变量,变量的某些属性是可以修改的,而某些属性不能修改,那么这个时候就可以用Cell 或者RefCell了:

1
2
3
4
5
6
7
8
9
10
11
12
use std::cell::Cell;

struct Point {
x: i32,
y: Cell<i32>,
}

let point = Point { x: 5, y: Cell::new(6) };

point.y.set(7);

println!("y: {:?}", point.y);

参考

The Rust Programming Language, Mutability

Zach的博客

Rust FFI

| 阅读次数

FFI

FFI(Foreign Function Interface),顾名思义,是Rust中用来调用其他语言的机制。值得注意的是,FFI在C和Rust之间实现了零抽象开销,也就是说在Rust调用C和C调用Rust时并没有运行时的花销。

一个例子

比方说我们定义了一个函数:

1
2
3
int double_input(int input) {
return intput * 2;
}

如果我们需要在Rust中调用它,那么main.rs文件应该是这样的:

1
2
3
4
5
6
7
8
9
10
11
12
extern crate libc;

#[link(name = "extlib")]
extern {
fn double_input(input: libc::c_int) -> libc::c_int;
}

fn main() {
let input = 4;
let output = unsafe { double_input(input) };
println!("{} * 2 = {}", input, output);
}

我们来一步一步剖析这个程序:

  • libc这个库提供了许多类型定义,用以桥街Rust和C的类型。

  • #[link(name = "extlib")]这个Attribute告诉编译器这个函数可以连接libextlib这个库而得到,这里的链接是动态链接。注意link属性还有另外一种形式:#[link(name = "extlib", kind = "static")],kind目前只有两个值:

    • static
    • framework(只在OSX中)

    如果不指定kind,那么默认为动态链接。

  • extern代码块声明从C语言调用的函数接口。

  • 因为编译器不知道C函数是如何实现,所以它假设内存安全问题会在你调用C函数时发生,所以我们必须用unsafe来包含调用C函数的语句。

  • 需要注意的是,我们需要在项目中添加一个build.rs文件来告诉编译如何编译C文件并生成libextlib,具体可以参考这个例子rust-to-c

安全抽象

如果我们把一个C函数绑定到Rust,不仅绑定的抽象开销为零,我们也可以让C函数变得更加安全。我们拿下面的例子来说明:

1
2
3
4
// Gets the data for a file in the tarball at the given index, returning NULL if
// it does not exist. The `size` pointer is filled in with the size of the file
// if successful.
const char *tarball_file_data(tarball_t *tarball, unsigned index, size_t *size);

假设我们调用这个函数,那么函数返回一个指针,而在之后某一个时刻,我们销毁了tarball所在内存,那么这时候这个指针就变成了野指针(dangling pointer),后续如果使用了这个指针,很可能程序就会崩溃。

如果我们把这个函数绑定到Rust:

1
2
3
4
5
6
7
8
9
10
11
12
13
14
15
16
pub struct Tarball { raw: *mut tarball_t }

impl Tarball {
pub fn file(&self, index: u32) -> Option<&[u8]> {
unsafe {
let mut size = 0;
let data = tarball_file_data(self.raw, index as libc::c_uint,
&mut size);
if data.is_null() {
None
} else {
Some(slice::from_raw_parts(data as *const u8, size as usize))
}
}
}
}

data的声明周期默认和一个Tarball对象绑定在一起,如果Tarball已经被销毁,那么data由于Rust的限制也不能被使用,程序编译都不会通过,从而保证了安全。

FFI和panics

需要注意的一点是,如果其他语言函数和panic!在同一个线程中被调用,那么结果是未定义的。如果编写的程序可能panic,我们就得让panic在另一个线程中被调用:

1
2
3
4
5
6
7
8
9
10
11
12
13
use std::thread;

#[no_mangle]
pub extern fn oh_no() -> i32 {
let h = thread::spawn(|| {
panic!("Oops!");
});

match h.join() {
Ok(_) => 1,
Err(_) => 0,
}
}
Zach的博客

Emacs Rust环境配置

| 阅读次数

Rust

Rust是一种注重高效、安全、并行的系统程序语言。它有以下特定:

  • 零开销抽象
  • 转移语义
  • 保证内存安全
  • 没有数据竞争的线程
  • trait泛型
  • 模式匹配
  • 类型推断
  • 极小的运行时
  • 高效的C绑定

Rust是一门有希望代替C++的语言,所以确实值得学习。于是这也就鼓捣了以下emacs下的环境配置。

环境配置

下载Rust

安装官方教程下载即可:

1
curl https://sh.rustup.rs -sSf | sh

Rust的包管理工具Cargo下载的包路径为~/.cargo,所以能直接调用相关命令,我们把它加到环境变量里:

1
export PATH="$HOME/.cargo/bin:$PATH"

还需要注意一点,cargo.io站点设置在国外,国内下载会很慢,所以还是要改一下源。我们就中科大的源就好。
修改$HOME/.cargo/config为:

1
2
3
4
5
[source.crates-io]
registry = "https://github.com/rust-lang/crates.io-index"
replace-with = 'ustc'
[source.ustc]
registry = "git://crates.mirrors.ustc.edu.cn/index"

同时在环境变量里添加:

1
export RUSTUP_DIST_SERVER=https://mirrors.ustc.edu.cn/rust-static

export RUSTUP_UPDATE_ROOT=https://mirrors.ustc.edu.cn/rust-static/rustup

rust-mode

rust-mode是Rust的major mode,直接M-x package-install rust-mode后将rust-mode加入auto-mode-list中:

1
(setq auto-mode-alist
	  (append
	   '(("\\.rs\\'" . rust-mode))
	   auto-mode-alist))

cargo

cargo.el是emacs内使用cargo命令的插件,M-x package-install cargo下载。

配置:

1
(add-hook 'rust-mode-hook 'cargo-minor-mode)

快捷键:

  • C-c C-c C-r:cargo run
  • C-c C-c C-b:cargo build
  • C-c C-c C-t:cargo test

flycheck-rust

flycheck-rust用于语法检查,M-x package-install flycheck-rust,

1
(add-hook 'rust-mode-hook #'flycheck-rust-setup)

rust-fmt

代码格式化工具,需要首先安装rustfmt:

1
cargo install rustfmt

然后安装插件M-x package-install rustfmt,配置如下:

1
(define-key rust-mode-map (kbd "C-c C-f") #'rust-format-buffer)

可以设置每次保存后自动格式化,但是我觉得不好用:

1
(add-hook 'rust-mode-hook #'rustfmt-enable-on-save)

rust racer

racer是emacs中Rust的代码提示插件,很好使,需要company插件支持,首先下载company,

1
M-x package-install company

下载racer:

1
cargo install racer

需要Rust的源码以便eldoc可以工作。配置如下:

1
;; rust racer
(setq racer-rust-src-path (expand-file-name "~/rust-1.12.1/src"))
(add-hook 'rust-mode-hook #'racer-mode)
(add-hook 'racer-mode-hook #'eldoc-mode)

(add-hook 'racer-mode-hook #'company-mode)
(define-key rust-mode-map (kbd "TAB") #'company-indent-or-complete-common)
(setq company-tooltip-align-annotations t)

toml-mode

Rust使用TOML文本来配置项目,toml-mode提供对应的语法高亮,直接下载即可:

1
M-x package-install toml-mode

我们也可以在toml-mode中使用company以便有自动补全:

1
(add-hook 'toml-mode-hook 'company-mode)
Zach的博客

快速添加gitignore

| 阅读次数

gitignore.io

gitignore.io是一个可以在线快速生成项目.gitignore文件的网站。
github也维护了一个gitignore文件的repo。

可以从上述网站很快得到想要的gitignore文件。

当然如果你和我一样喜欢命令行,那么官方推荐的方法更值得拥有:

1
#!/bin/bash
$ echo "function gi() { curl -L -s https://www.gitignore.io/api/\$@ ;}" >> ~/.bashrc && source ~/.bashrc

#!/bin/zsh
$ echo "function gi() { curl -L -s https://www.gitignore.io/api/\$@ ;}" >> ~/.zshrc && source ~/.zshrc

上述代码在用户环境变量文件中添加了一个函数gi,以后我们就可以这样来添加gitignore了:

1
gi CMake > .gitignore
gi C >> .gitignore
Zach的博客

线程基础

| 阅读次数

线程标识

每一个线程有一个线程ID,线程ID不像进程ID一样在整个系统唯一,它只在进程的上下文中才有意义。线程ID用pthread_t结构表示,不同的实现下,pthread_t的内部表示不同,Linux用长整型表示,而Mac OS X下用指针来表示,所以不能简单的将其转换成长整型来比较。用以下接口来获得和比较线程ID:

1
2
3
4
5
#include <pthread.h>

int pthread_equal(pthread_t tid1, pthread_t tid2);

pthread_t pthread_self(void);

线程创建

创建线程的接口:

1
2
3
4
5
#include <pthread.h>

int pthread_create(pthread_t *restrict tidp,
const pthread_attr_t *restrict attr,
void *(start_rtn)(void *), void *restrict arg);

pthread函数在发生错误时通常会返回错误码,而不去依赖全局的errno。

pthread_attr_t指定创建的线程的属性,如果只需要默认的属性,将其设置为NULL即可。

POSIX.1定义的线程属性如下:

  • detachstate:线程的分离状态属性
  • guardsize:线程栈尾的警戒缓冲区大小
  • stackaddr:线程栈的最低地址
  • stacksize:线程栈的最小长度

线程创建后默认状态是PTHREAD_CREATE_JOINABLE,其终止状态,即线程执行最后的返回参数或者调用pthread_exit时传递的参数会保留知道对该线程调用pthread_join。如果线程已经分离,那么线程的底层存储资源可以在线程终止时立即被收回。可以在创建时指定detachstate为PTHREAD_CREATE_DETACHED或者创建之后调用pthread_detach函数来指定线程分离。在线程被分离之后,我们不能调用pthread_join来等待它的终止状态,这会产生未定义的行为。

线程属性guardsize控制线程栈末尾(栈顶上方)之后用于避免栈溢出的扩展内存大小。这个默认值和具体的实现相关,如果设置为0,那么该机制就无效了。同样的,如果修改了线程的stackaddr属性,那么系统就认为我们要自己管理线程栈,该缓冲区机制无效。在这种缓冲机制下,如果线程栈指针溢出到了警戒区域,那么应用程序就可能通过信号接收到出错信息。

stackaddr和stacksize顾名思义就是用来管理新创建线程的栈空间的。stackaddr线程属性被定义为栈的最低内存地址,一般来说栈是向低地址增长的,所以stackaddr一般来说是栈顶位置。如果只是希望改变栈的大小,而不自己管理栈空间,可以只设置stacksize属性,该属性值不能小于PTHREAD_STACK_MIN。

相关接口如下:

1
2
3
4
5
6
7
8
9
10
11
12
13
14
15
16
17
18
19
20
21
22
23
24
25
26
27
28
29
30
31
32
33
#include <pthread.h>

// 初始化属性,销毁属性对象
int pthread_attr_init(pthread_attr_t *attr);
int pthread_attr_destroy(pthread_attr_t *attr);

// 分离状态
/*
* PTHREAD_CREATE_JOINABLE
* PTHREAD_CREATE_DETACHED
*/

int pthread_attr_getdetachstate(const pthread_attr_t *restrict attr,
int *detachstate)
;

int pthread_attr_setdetachstate(pthread_attr_t *attr, int detachstate);

int pthread_detach(pthread_t tid);

// 设置线程栈
int pthread_attr_getstack(const pthread_attr_t *restrict attr,
void **restrict stackaddr,
size_t *restrict stacksize)
;

int pthread_attr_setstack(pthread_attr_t *attr,
void *stackaddr,
size_t stacksize)
;

int pthread_attr_getstacksize(const pthread_attr_t *restrict attr,
size_t *restrict stacksize)
;

int pthread_attr_setstacksize(pthread_attr_t *attr, size_t stacksize);

// 警戒区大小
int pthread_attr_getguardsize(const pthread_attr_t *restrict attr,
size_t *restrict guardsize)
;

int pthread_attr_setguardsize(pthread_attr_t *attr,
size_t guardsize)
;

一个设置线程分离状态的帮助函数例子:

1
2
3
4
5
6
7
8
9
10
11
12
13
14
15
16
17
18
#include <pthread.h>

int makethread(void *(*fn)(void *), void *arg) {
int err;
pthread_t tid;
pthread_attr_t attr;

err = pthread_attr_init(&attr);
if (err != 0)
return err;
err = pthread_attr_setdetachstate(&attr, PTHREAD_CREATE_DETACHED);
if (err == 0) {
err = pthread_create(&tid, &attr, fn, arg);
}
pthread_attr_destroy(&attr);

return err;
}

线程终止

如果进程中有任何一个线程调用了exit、_Exit或者_exit中任何一个函数,那么整个进程就会终止。同样的,如果发送到某一个线程的信号的默认动作是终止进程,那么整个进程也就会被终止。

单个线程可以通过3中方式退出而不终止整个进程:

  • 从线程的启动例程返回,返回值是退出码
  • 线程可以被同一个进程中的其他线程取消
  • 线程调用pthread_exit。

如果一个线程未被分离,那么可以用pthread_join函数获得线程的退出状态码。

相关的接口如下:

1
2
3
4
5
6
7
8
9
10
11
12
#include <pthread.h>

void pthread_exit(void *rval_ptr);

int pthread_join(pthread_t thread, void **rval_ptr);

// 取消线程
int pthread_cancel(pthread_t tid);

// 清理函数
void pthread_cleanup_push(void (*rtn)(void *), void *arg);
void pthread_cleanup_pop(int execute);

线程的退出的例子可以参考:pthread_exit

需要注意的一点是,如果线程从启动例程正常返回,那么rval_ptr就包含返回码;如果线程被取消,由rval_ptr指定的内存单元就设置为PTHREAD_CANCELED。

线程可以像进程一样安排它退出时需要调用的线程清理程序。一个线程可以建立多个清理处理程序,程序的执行顺序和建立顺序相反。

当线程执行以下动作时,清理函数被调度执行:

  • 调用pthread_exit
  • 响应取消请求
  • 用非零execute参数调用pthread_cleanup_pop。

如果execute参数设置为0,那么清理函数不会被调用,但是无论execute参数如何,pthread_cleanup_pop都将删除最近一次pthread_cleanup_push建立的清理处理程序。

这里需要注意一点,pthread_cleanup_push和pthread_cleanup_pop可能被实现为宏,所以必须在与线程相同的作用域中以匹配对的形式使用。

一个例子:

1
2
3
4
5
6
7
8
9
10
11
12
13
14
15
16
17
18
19
20
21
22
23
24
25
26
27
28
29
30
31
32
33
34
35
36
37
38
39
40
41
42
43
44
45
46
47
48
49
50
51
52
53
54
55
#include <stdio.h>
#include <pthread.h>
#include <stdlib.h>
#include <string.h>
#include <unistd.h>

void cleanup(void *arg) {
char *msg = (char *)arg;

printf("%s\n", msg);
}

void *thr_fn1(void *arg) {
printf("thread 1 start\n");
pthread_cleanup_push(cleanup, "thread1 first cleanup");
pthread_cleanup_push(cleanup, "thread1 second cleanup");

if (arg)
return (void *)1;

pthread_cleanup_pop(0);
return (void *)1;
}

void *thr_fn2(void *arg) {
printf("thread 2 start\n");

pthread_cleanup_push(cleanup, "thread2 first cleanup");
pthread_cleanup_push(cleanup, "thread2 second cleanup");

if (arg)
pthread_exit((void *)2);

pthread_cleanup_pop(0);

pthread_exit((void *)2);
}

int main(void) {
int err;
pthread_t tid1, tid2;

err = pthread_create(&tid1, NULL, thr_fn1, (void *)1);
err = pthread_create(&tid2, NULL, thr_fn2, (void *)2);

void *tret;
err = pthread_join(tid1, &tret);
printf("thread 1 ended with status: %ld\n", (long)tret);
err = pthread_join(tid2, &tret);
printf("thread2 ended with status: %ld\n", (long)tret);

return 0;
}

线程1只是简单地从启动例程返回,而线程2调用了pthread_exit以结束启动例程。

结果输出:

1
$ ./a.out 
thread 1 start
thread 2 start
thread 1 ended with status: 1
thread2 second cleanup
thread2 first cleanup
thread2 ended with status: 2

可以看到只有线程2调用了清理程序,而且清理程序的执行顺序和建立顺序相反。

线程取消的一些细节

前面提到线程可以被另外一个线程取消,但是这种行为是可以被关闭的。可取消状态属性控制着线程的是否响应取消请求,这个属性用两个值表示:

  • PTHREAD_CANCEL_ENABLE
  • PTHREAD_CANCEL_DISABLE

可以通过以下接口来修改线程的这一状态属性:

1
2
3
#include <pthread.h>

int pthread_setcancelstate(int state, int *oldstate);

在默认的情况下,线程在取消请求被发出后仍然继续执行,只有到某一个取消点时,线程才响应取消请求,执行清理函数。取消点会在调用某一个函数时出现,如调用了sleep函数。当线程的状态为PTHREAD_CANCEL_DISABLE时,如果发出了一个取消请求,那么线程不会被杀死,该请求被挂起,在状态更改为PTHREAD_CANCEL_ENABLE后,线程就会在下一个取消点响应这个取消请求。用户也可以调用pthread_testcancel这个函数,添加自己的取消点。

1
2
3
#include <pthread.h>

void pthread_testcancel(void);

一个例子:

1
2
3
4
5
6
7
8
9
10
11
12
13
14
15
16
17
18
19
20
21
22
23
24
25
26
27
28
29
30
31
32
33
34
35
36
37
38
39
40
41
42
43
44
45
46
47
48
49
50
51
52
53
54
55
56
57
58
59
60
61
62
63
64
65
#include <stdio.h>
#include <pthread.h>
#include <stdlib.h>
#include <string.h>
#include <unistd.h>

void cleanup(void *arg) {
char *msg = (char *)arg;

printf("%s\n", msg);
}

void *thr_fn1(void *arg) {
printf("waiting for canceling.\n");

/* pthread_setcancelstate(PTHREAD_CANCEL_DISABLE, NULL); */

pthread_cleanup_push(cleanup, "first cleanup");
pthread_cleanup_push(cleanup, "second cleanup");
/* must put this after cleanup push so cleanup can be executed */
sleep(30);
/* pthread_testcancel(); */
pthread_exit((void *)0);

pthread_cleanup_pop(0);
}

void *thr_fn2(void *arg) {
sleep(5);

pthread_t tid2cancel = (pthread_t)arg;

printf("cancel thread 1\n");
int err = pthread_cancel(tid2cancel);
if (err != 0) {
fprintf(stderr, "pthread_cancel error: %s\n", strerror(err));
}

return (void *)0;
}

int main(void) {
int err;
pthread_t tid1, tid2;
pthread_attr_t attr;

err = pthread_attr_init(&attr);
err = pthread_attr_setdetachstate(&attr, PTHREAD_CREATE_DETACHED);

err = pthread_create(&tid1, NULL, thr_fn1, NULL);
err = pthread_create(&tid2, &attr, thr_fn2, (void *)tid1);

pthread_attr_destroy(&attr);

void *tret;
err = pthread_join(tid1, &tret);
if (tret == PTHREAD_CANCELED) {
printf("thread 1 is canceled\n");
} else {
printf("some error occurred\n");
}

return 0;
}

线程2在执行后马上睡眠,以便让线程1首先执行,在线程1建立完清理函数后,线程1睡眠,于是就有了一个取消点。线程2在睡眠结束后调用pthread_cancel 取消线程1,于是线程1响应这个请求,清理函数被执行。

结果如下:

1
$ ./a.out 
waiting for canceling.
cancel thread 1
second cleanup
first cleanup
thread 1 is canceled

我们也可以自己调用pthread_testcancel设置一个取消点。

1
2
3
4
5
6
7
8
9
10
11
12
13
14
15
16
17
18
19
20
21
22
23
24
25
26
27
28
29
30
31
32
33
34
35
36
37
38
39
40
41
42
43
44
45
46
47
48
49
50
51
52
53
54
55
56
57
58
59
60
61
62
63
64
65
66
67
68
69
70
#include <stdio.h>
#include <pthread.h>
#include <stdlib.h>
#include <string.h>
#include <unistd.h>
#include <time.h>

void cleanup(void *arg) {
char *msg = (char *)arg;

printf("%s\n", msg);
}

void *thr_fn1(void *arg) {
printf("waiting for canceling.\n");

/* pthread_setcancelstate(PTHREAD_CANCEL_DISABLE, NULL); */

pthread_cleanup_push(cleanup, "first cleanup");
pthread_cleanup_push(cleanup, "second cleanup");
/* must put this after cleanup push so cleanup can be executed */
for (time_t t = time(NULL); t+5 > time(NULL); )
continue;
pthread_testcancel();
if (arg)
return (void *)0;

pthread_cleanup_pop(0);

return (void *)0;
}

void *thr_fn2(void *arg) {
sleep(2);

pthread_t tid2cancel = (pthread_t)arg;

printf("cancel thread 1\n");
int err = pthread_cancel(tid2cancel);
if (err != 0) {
fprintf(stderr, "pthread_cancel error: %s\n", strerror(err));
}

return (void *)0;
}

int main(void) {
int err;
pthread_t tid1, tid2;
pthread_attr_t attr;

err = pthread_attr_init(&attr);
err = pthread_attr_setdetachstate(&attr, PTHREAD_CREATE_DETACHED);

err = pthread_create(&tid1, NULL, thr_fn1, NULL);
err = pthread_create(&tid2, &attr, thr_fn2, (void *)tid1);

pthread_attr_destroy(&attr);

void *tret;
err = pthread_join(tid1, &tret);
if (tret == PTHREAD_CANCELED) {
printf("thread 1 is canceled\n");
} else {
printf("some error occurred\n");
}

return 0;
}

线程1中,在设置了清理函数之后,我们让线程空转,以防止它过早的结束,否则线程2在调用pthread_cancel的时候就会出错。

运行结果如下:

1
$ ./a.out 
waiting for canceling.
cancel thread 1
second cleanup
first cleanup
thread 1 is canceled

线程同步

当有多个线程共享相同的内存时,需要确保每个线程看到一致的数据视图。当一个线程修改一个变量时,如果变量的修改时间多于一个存储器访问周期,那么就有可能出现不一致的情况。我们需要利用线程的同步机制来保证数据的一致。

互斥量

利用pthread提供的互斥接口,可以确保同一时间只有一个线程访问数据。互斥量是一把锁,线程在访问数据前必须获得这个锁,否则线程无法访问数据。互斥量用pthread_mutex_t表示,在使用该变量前,必须将其初始化,如果是静态分配的互斥量,那么可以把它设置为PTHREAD_MUTEX_INIITIALIZER,否则就需要调用pthread_mutex_init来初始化锁。

1
2
3
4
5
#include <pthread.h>

int pthread_mutex_init(pthread_mutex_t *restrict mutex,
const pthread_mutexattr_t *restrict attr)
;

int pthread_mutex_desctroy(pthread_mutex_t *mutex);

获得和释放互斥量的锁的接口如下:

1
2
3
4
5
6
7
#include <pthread.h>

int pthread_mutex_lock(pthread_mutex_t *mutex);
int pthread_mutex_trylock(pthread_mutex_t *mutex);
int pthread_mutex_timedlock(pthread_mutex_t *restrict mutex,
const struct timespec *restrict tsptr)
;

int pthread_mutex_unlock(pthread_mutex_t *mutex);

pthread_mutex_lock会阻塞线程,知道它可以获得锁,如果线程不想被阻塞,可以调用pthread_mutex_trylock,如果互斥量未被加锁,那么线程获得互斥量的锁,否则,函数立即返回,返回的错误码为EBUSY。

在使用互斥量的时候要注意避免死锁的情况:假设线程A拥有互斥量a的锁,线程B拥有互斥量b的锁,如果在某一个时刻,线程A请求b的锁,然后线程A被睡眠,此后线程B被唤醒,它请求a的锁,这个时候线程A和线程B被相互阻塞,出现了死锁。

为了避免这种情况,当我们用两个或者两个以上的互斥量的时候,需要注意请求互斥量的锁的顺序。比如在上述例子中,我们规定互斥量的a的锁必须在互斥量b的锁之前获取。这样一样,线程B在获得b的锁之前必须请求一次a的锁,这样的话线程B就会因线程A占有a的锁而被阻塞,线程A可以获得a和b的锁,当A执行完之后释放所有的锁,线程B也得到了执行。

互斥量的属性

在调用pthread_mutex_init时,可以看到函数还接受一个pthread_mutexattr_t变量参数,该参数指定了互斥量的属性,如果只需要默认的属性,那么将参数设置为NULL即可。

初始化和销毁接口:

1
2
3
4
#include <pthread.h>

int pthread_mutexattr_init(pthread_mutexattr_t *attr);
int pthread_mutexattr_destroy(pthread_mutexattr_t *attr);

互斥量有如下属性:

  • 进程共享属性:如果互斥量属于多个进程彼此共享的内存空间,那么该属性如果为PTHREAD_PROCESS_SHARED,那么不同进程可以利用这个互斥量进程同步;如果该属性为PTHREAD_PROCESS_PRIVATE,那么只有同一个进程的线程可以利用这个互斥量进程同步,这也是默认的行为
  • 健壮属性:不太懂
  • 一致性属性:不太懂
  • 类型属性:有四种类型的互斥量
    • PTHREAD_MUTEX_NORMAL:标准互斥量类型,不做任何特殊的错误检查和死锁检测
    • PTHREAD_MUTEX_ERRORCHECK:提供错误检查的互斥量
    • PTHREAD_MUTEX_RECURSIVE:递归互斥量类型,在获得互斥量的锁之后,允许再次获得锁,解锁时,必须调用相同次数的解锁操作。
    • PTHREAD_MUTEX_DEFAULT:提供默认特性和行为的互斥量,操作系统可以把这个类型映射到上述三种中的任意一个类型,可具体实现有关。

四种类型的锁的行为如下所示。不占用时解锁指:一个线程对被另外一个线程枷锁的互斥量进行解锁;在已解锁时解锁指:线程对一个已经解锁的互斥量再次解锁的情况。

互斥量类型 没有解锁时重新加锁 不占用时解锁 已解锁时解锁
PTHREAD_MUTEX_NORMAL 死锁 未定义 未定义
PTHREAD_MUTEX_ERRORCHECK 返回错误 返回错误 返回错误
PTHREAD_MUTEX_RECURSIVE 允许 返回错误 返回错误
PTHREAD_MUTEX_DEFAULT 未定义 未定义 未定义

设置类型的接口:

1
2
3
4
5
#include <pthread.h>

int pthread_mutexattr_settype(pthread_mutexattr_t *attr, int type);
int pthread_mutexattr_gettype(const pthread_mutexattr_t *restrict attr,
int *restrict type)
;

一个递归锁的例子:

1
2
3
4
5
6
7
8
9
10
11
12
13
14
15
16
17
18
19
20
21
22
23
24
25
26
27
28
29
30
31
32
33
34
35
36
37
38
39
40
41
42
43
44
45
46
47
48
49
50
51
52
53
54
55
56
57
58
59
60
61
62
63
64
65
66
67
68
69
70
71
72
73
74
75
76
77
78
79
80
81
82
83
84
85
86
87
88
89
90
91
92
93
94
#include <stdio.h>
#include <pthread.h>
#include <stdlib.h>
#include <string.h>
#include <unistd.h>
#include <time.h>

#include "pthread_functions.h"

struct to_info {
void *(*fn)(void *);
void *to_arg;
int to_wait;
};

void *timer_helper(void *arg) {
struct to_info *tip;

tip = (struct to_info *)arg;
printf("sleep for %d secs\n", tip -> to_wait);
sleep(tip -> to_wait);
(tip -> fn)(tip -> to_arg);
free(arg);

return (void *)0;
}

void timeout(const int when, void *(*fn)(void *), void *arg) {
struct to_info *tip;

tip = (struct to_info *)malloc(sizeof(struct to_info));
if (tip != NULL) {
tip -> to_wait = when;
tip -> fn = fn;
tip -> to_arg = arg;

pthread_t tid;
int err = makethread(timer_helper, (void *)tip, &tid);

if (err != 0) {
fprintf(stderr, "makethread error: %s\n", strerror(err));
free(tip);
exit(-1);
}
}
}

pthread_mutex_t lock;
pthread_mutexattr_t attr;

static volatile int flag = 0;

void *retry(void *arg) {
pthread_mutex_lock(&lock);

printf("Recursive lock\n");
flag = 1;
pthread_mutex_unlock(&lock);

return (void *)0;
}

int main(void) {
int err;

err = pthread_mutexattr_init(&attr);
if (err != 0) {
fprintf(stderr, "pthread_mutexattr_init error: %s\n", strerror(err));
exit(-1);
}

err = pthread_mutexattr_settype(&attr, PTHREAD_MUTEX_RECURSIVE);
if (err != 0) {
fprintf(stderr, "pthread_mutexattr_settype error: %s\n", strerror(err));
exit(-1);
}

err = pthread_mutex_init(&lock, &attr);
if (err != 0) {
fprintf(stderr, "pthread_mutex_init error: %s\n", strerror(err));
exit(-1);
}

pthread_mutex_lock(&lock);

timeout(4, retry, NULL);

pthread_mutex_unlock(&lock);

while (!flag)
;

return 0;
}

条件变量

条件变量时线程可用的另外一种同步机制。条件变量给多个线程提供了一个会和的场所。条件变量和互斥变量一起使用时,允许线程以无竞争的方式等待特定的条件发生。条件变量本身是被互斥量保护的,线程在改变条件之前,必须锁住互斥量。

条件变量以pthread_cond_t结构表示,同样的,静态分配的变量可以用PTHREAD_COND_INITIALIZER初始化,动态分配的必须使用pthread_cond_init函数来初始化变量。

相关接口:

1
2
3
4
5
6
7
8
9
10
11
12
13
14
15
16
#include <pthread.h>

int pthread_cond_init(pthread_cond_t *restrict cond,
const pthread_condattr_t *restrict attr)
;


int pthread_cond_destroy(pthread_cond_t *cond);

int pthread_cond_wait(pthread_cond_t *restrict cond,
pthread_mutex_t *restrict mutex)
;


int pthread_cond_timedwait(pthread_cond_t *restrict cond,
pthread_mutex_t *restrict mutex,
const struct timespec *restrict tsptr)
;


int pthread_cond_signal(pthread_cond_t *cond);
int pthread_cond_broadcast(pthread_cond_t *cond);

传递给pthread_cond_wait的互斥量堆条件进行保护,调用者把锁住的互斥量传递给函数,函数然后自动把调用线程放到等待条件的线程列表中,对互斥量解锁。当获得互斥量之后,互斥量再一次被锁住。

pthread_cond_signal和pthread_cond_broadcast用于通知线程条件已经得到满足,pthread_cond_signal可以唤醒一个等待条件的线程,pthread_cond_broadcast则用于唤醒所有等待该条件的线程。

一个条件变量的简单例子:

1
2
3
4
5
6
7
8
9
10
11
12
13
14
15
16
17
18
19
20
21
22
23
24
25
26
27
28
29
30
31
32
33
34
35
36
37
38
39
40
41
42
43
44
45
46
47
48
49
50
51
52
53
54
55
56
57
58
59
60
61
62
63
64
65
66
67
68
69
70
71
72
73
74
75
#include <stdio.h>
#include <pthread.h>
#include <signal.h>
#include <stdlib.h>
#include <string.h>

int quitflag;
sigset_t mask;

pthread_mutex_t lock = PTHREAD_MUTEX_INITIALIZER;
pthread_cond_t waitloc = PTHREAD_COND_INITIALIZER;

void *thr_fn(void *arg) {
int err, signo;

for (;;) {
err = sigwait(&mask, &signo);
if (err != 0) {
fprintf(stderr, "sigwait failed: %s\n", strerror(err));
exit(-1);
}

switch (signo) {
case SIGINT: {
printf("\ninterrupt\n");
break;
}
case SIGQUIT: {
pthread_mutex_lock(&lock);
quitflag = 1;
pthread_mutex_unlock(&lock);
pthread_cond_signal(&waitloc);

return (void *)0;
}
default:
printf("unexpected signal: %d\n", signo);
exit(-1);
}
}
}

int main(void) {
int err;
sigset_t oldmask;
pthread_t tid;

/* sigemptyset(&mask); */
/* sigaddset(&mask, SIGQUIT); */
/* sigaddset(&mask, SIGINT); */
sigfillset(&mask);
if ((err = pthread_sigmask(SIG_BLOCK, &mask, &oldmask)) != 0) {
fprintf(stderr, "SIG_BLOCK error: %s\n", strerror(err));
exit(-1);
}

err = pthread_create(&tid, NULL, thr_fn, NULL);
if (err != 0) {
fprintf(stderr, "pthread_create error: %s\n", strerror(err));
exit(-1);
}

pthread_mutex_lock(&lock);
while (quitflag == 0) {
pthread_cond_wait(&waitloc, &lock);
}

printf("SIGQUIT received\n");

if (sigprocmask(SIG_SETMASK, &oldmask, NULL) != 0) {
fprintf(stderr, "SIG_SETMASK error\n");
exit(-1);
}
return 0;
}

在这里例子中,我们创建一个线程专门用于接收信号,如果SIGQUIT信号到来,那么主线程等待的条件得到满足,调用pthread_cond_signal通知这一事件,于是主线程被唤醒得以继续执行。

输出:

1
$ ./a.out 
^C
interrupt
^C
interrupt
^\SIGQUIT received

读写锁

读写锁也成为共享互斥锁。一个读写锁在读模式被锁住时,其他线程仍然可以以读模式锁住读写锁,但是不能以写模式锁住读写锁;而当读写锁以写模式锁住时,无论如何其他线程都无法锁住这个读写锁。读写锁适用于对数据结构读的次数远大于写的情况。

如果是静态分配的读写锁,可以将PTHREAD_RWLOCK_INITIALIZER赋予给它以初始化,否则需要调用pthread_rwlock_init函数来初始化读写锁。

相关接口:

1
2
3
4
5
6
7
8
9
10
11
12
13
14
15
16
17
18
19
20
#include <pthread.h>

int pthread_rwlock_init(pthread_rwlock_t *restrict rwlock,
const pthread_rwlockattr_t *restrict attr)
;

int pthread_rwlock_destroy(pthread_rwlock_t *rwlock);

int pthread_rwlock_rdlock(pthread_rwlock_t *rwlock);
int pthread_rwlock_wrlock(pthread_rwlock_t *rwlock);
int pthread_rwlock_unlock(pthread_rwlock_t *rwlock);

// 非阻塞的读写锁
int pthread_rwlock_tryrdlock(pthread_rwlock_t *rwlock);
int pthread_rwlock_trywrlock(pthread_rwlock_t *rwlock);

// 带超时的读写锁
int pthread_rwlock_timedrdlock(pthread_rwlock_t *restrict rwlock,
const struct timespec *restrict tsptr)
;


int pthread_rwlock_timedwrlock(pthread_rwlock_t *restrict rwlock,
const struct timespec *restrict tsptr)
;

读写锁唯一支持的属性是进程共享属性,它和互斥量的进程共享属性是相同的,如果设置为PTHREAD_PROCESS_SHARED,那么多个进程可以利用它进行任务同步操作。

相关接口:

1
2
3
4
5
6
7
8
9
#include <pthread.h>

int pthread_rwlockattr_init(pthread_rwlockattr_t *attr);
int pthread_rwlockattr_destroy(pthread_rwlockattr_t *attr);

int pthread_rwlockattr_getpshared(const pthread_rwlockattr_t *restrict attr,
int *restrict pshared)
;

int pthread_rwlockattr_setpshared(pthread_rwlockattr_t *attr,
int pshared)
;

这里给出一个利用任务队列实现读写锁的例子,程序允许任务队列并发地搜索任务队列,但是要写入或者删除队列时,必须获得写模式的读写锁。

1
2
3
4
5
6
7
8
9
10
11
12
13
14
15
16
17
18
19
20
21
22
23
24
25
26
27
28
29
30
31
32
33
34
35
36
37
38
39
40
41
42
43
44
45
46
47
48
49
50
51
52
53
54
55
56
57
58
59
60
61
62
63
64
65
66
67
68
69
70
71
72
73
74
75
76
77
78
79
80
81
82
83
84
85
86
87
88
89
90
91
92
93
94
95
96
97
98
99
100
101
102
103
104
105
106
107
108
109
110
111
112
113
114
115
116
117
118
119
120
121
122
123
124
125
126
127
128
129
130
131
132
133
134
135
136
137
138
139
140
141
142
143
144
145
146
147
148
149
150
151
152
153
154
155
156
157
158
159
160
161
162
163
164
165
166
167
168
169
170
171
172
173
174
175
176
177
178
179
180
181
182
183
184
#include <stdio.h>
#include <pthread.h>
#include <stdlib.h>
#include <string.h>
#include <unistd.h>
#include <time.h>
struct job
{
int j_id;
struct job *j_prev;
struct job *j_next;
};

struct queue
{
pthread_rwlock_t q_lock;
struct job *q_head;
struct job *q_tail;
};

int queue_init(struct queue *qp) {

int err;

qp -> q_head = NULL;
qp -> q_tail = NULL;
err = pthread_rwlock_init(&qp -> q_lock, NULL);
if (err)
return err;
return 0;
}

void delay(int sec) {
time_t t;
for (t = time(NULL); t+sec > time(NULL); )
;
}

void job_insert(struct queue *qp, struct job *jp) {
// insert a job at head
pthread_rwlock_wrlock(&qp -> q_lock);
jp -> j_next = qp -> q_head;
jp -> j_prev = NULL;
if (qp -> q_head != NULL) {
qp -> q_head -> j_prev = jp;
} else {
// empty list
qp -> q_tail = jp;
}
qp -> q_head = jp;
pthread_rwlock_unlock(&qp -> q_lock);
}

void job_append(struct queue *qp, struct job *jp) {
// append a job to the list
pthread_rwlock_wrlock(&qp -> q_lock);
jp -> j_prev = qp -> q_tail;
jp -> j_next = NULL;
if (qp -> q_tail != NULL) {
qp -> q_tail -> j_next = jp;
} else {
qp -> q_head = jp;
}
qp -> q_tail = jp;
pthread_rwlock_unlock(&qp -> q_lock);
}

void job_remove(struct queue *qp, struct job *jp) {
pthread_rwlock_wrlock(&qp -> q_lock);
if (jp == qp -> q_head) {
qp -> q_head = jp -> j_next;
if (qp -> q_tail == jp) {
qp -> q_tail = NULL;
} else {
jp -> j_next -> j_prev = NULL;
}
} else if (jp == qp -> q_tail) {
qp -> q_tail = jp -> j_prev;
if (jp == qp -> q_head) {
qp -> q_head = NULL;
} else {
jp -> j_prev -> j_next = NULL;
}
} else {
jp -> j_prev -> j_next = jp -> j_next;
jp -> j_next -> j_prev = jp -> j_prev;
}
pthread_rwlock_unlock(&qp -> q_lock);
}

struct job *job_find(struct queue *qp, int id) {
struct job *jp;
if (pthread_rwlock_rdlock(&qp -> q_lock) != 0)
return NULL;

for (jp = qp -> q_head; jp != NULL; jp = jp -> j_next) {
if (jp -> j_id == id)
break;
}
pthread_rwlock_unlock(&qp -> q_lock);
return jp;
}

void traverse_jobs(struct queue *qp) {
struct job *jp;
int err;
if ((err = pthread_rwlock_rdlock(&qp -> q_lock)) != 0) {
fprintf(stderr, "pthread_rwlock_rdlock error: %s\n", strerror(err));
exit(-1);
}
printf("delay before traversing\n");
delay(5);
printf("Queue:");
for (jp = qp -> q_head; jp != NULL; jp = jp-> j_next) {
printf(" %d", jp -> j_id);
}
printf("\n");
pthread_rwlock_unlock(&qp -> q_lock);
}

#define NJOBS 20
struct queue *qp;
struct job* jp_arr[NJOBS];

void *thr_fn1(void *arg) {
for (int i=0; i<NJOBS; i++) {
printf("inserting\n");
struct job *jp = malloc(sizeof(struct job));
jp -> j_id = i;
if (i%2)
job_insert(qp, jp);
else
job_append(qp, jp);
jp_arr[i] = jp;
delay(1);
}

for (int i=0; i<NJOBS; i++) {
printf("deleting\n");
job_remove(qp, jp_arr[i]);
delay(1);
}
return (void *)0;
}

void *thr_fn2(void *arg) {
sleep(5);
while (qp -> q_head != qp -> q_tail) {
traverse_jobs(qp);
delay(3);
}
printf("Done\n");
return (void *)0;
}

int main(void) {
int err;
pthread_t tid1, tid2;
void *tret;

setbuf(stdout, NULL);

qp = (struct queue *)malloc(sizeof(struct queue));
err = queue_init(qp);
if (err != 0) {
fprintf(stderr, "error: %s\n", strerror(err));
exit(-1);
}

err = pthread_create(&tid1, NULL, thr_fn1, NULL);
if (err != 0) {
fprintf(stderr, "error: %s\n", strerror(err));
exit(-1);
}
err = pthread_create(&tid2, NULL, thr_fn2, NULL);
if (err != 0) {
fprintf(stderr, "error: %s\n", strerror(err));
exit(-1);
}
err = pthread_join(tid1, &tret);
err = pthread_join(tid2, &tret);

return 0;
}

屏障

屏障是用户协调多个线程并行工作的同步机制。它允许多个线程暂停等待,直到所有的合作线程都达到某一点,然后从该点继续执行。pthread_join就是一种屏障,它暂停当前线程的运行,直到指定的线程退出为止。

接口如下:

1
2
3
4
5
6
7
8
#include <pthread.h>

int pthread_barrier_init(pthread_barrier_t *restrict barriet,
const pthread_barrierattr_t *restrict attr,
unsigned int count)
;

int pthread_barrier_destroy(pthread_barrier_t *barrier);

int pthread_barrier_wait(pthread_barrier_t *barrier);

初始化屏障时,使用count参数指定,在允许所有线程继续运行之前,必须达到屏障的线程数目。对于任意一个线程,pthread_barrier_wait函数返回了PTHREAD_BARRIER_SERIAL_THREAD,剩下的函数看到的返回都是0,这使得一个线程可以作为主线程,它可以工作在其他所有线程已完成的工作结果上。

屏障目前定义的只有进程共享属性。

1
2
3
4
5
6
7
8
9
#include <pthread.h>

int pthread_barrierattr_init(pthread_barrierattr_t *attr);
int pthread_barrierattr_destroy(pthread_barrierattr_t *attr);

int pthread_barrierattr_getpshared(const pthread_barrierattr_t *restrict attr,
int *restrict pshared)
;

int pthread_barrierattr_setpshared(pthread_barrierattr_t *attr,
int pshared)
;

一个利用屏障来排序一个庞大的数组的实例:

1
2
3
4
5
6
7
8
9
10
11
12
13
14
15
16
17
18
19
20
21
22
23
24
25
26
27
28
29
30
31
32
33
34
35
36
37
38
39
40
41
42
43
44
45
46
47
48
49
50
51
52
53
54
55
56
57
58
59
60
61
62
63
64
65
66
67
68
69
70
71
72
73
74
75
76
77
78
79
80
81
82
83
84
85
86
87
88
89
90
91
#include <stdio.h>
#include <limits.h>
#include <sys/time.h>
#include <stdlib.h>
#include <pthread.h>
#include <string.h>

#define NTHR 8
#define NUMNUM 8000000L
#define TNUM (NUMNUM / NTHR)

long nums[NUMNUM];
long snums[NUMNUM];

pthread_barrier_t barrier;

int cmplong(const void *arg1, const void *arg2) {
long l1 = *(long *)arg1;
long l2 = *(long *)arg2;

if (l1 == l2)
return 0;
else if (l1 < l2)
return -1;
else
return 1;
}

void *thr_fn(void *arg) {
long idx = (long)arg;

qsort(&nums[idx], TNUM, sizeof(long), cmplong);
pthread_barrier_wait(&barrier);

return (void *)0;
}

void merge() {
long idx[NTHR];
long minidx, num;

for (int i=0; i<NTHR; i++)
idx[i] = i*TNUM;
for (int sidx = 0; sidx<NUMNUM; sidx++) {
num = LONG_MAX;
for (int i=0; i<NTHR; i++) {
if (idx[i] < (i+1)*TNUM && num > nums[idx[i]]) {
num = nums[idx[i]];
minidx = i;
}
}

snums[sidx] = num;
idx[minidx] += 1;
}
}

int main(void) {
int err;
pthread_t tid;
struct timeval start, end;
long long startusec, endusec;
double elapsed;

srandom(1);
for (long long i=0; i<NUMNUM; i++) {
nums[i] = random();
}

gettimeofday(&start, NULL);
pthread_barrier_init(&barrier, NULL, NTHR+1);
for (int i=0; i<NTHR; i++) {
err = pthread_create(&tid, NULL, thr_fn, (void *)(i*TNUM));
if (err != 0) {
fprintf(stderr, "pthread_create error: %s\n", strerror(err));
exit(-1);
}
}
pthread_barrier_wait(&barrier);
merge();
gettimeofday(&end, NULL);

startusec = start.tv_sec * 1000000 + start.tv_usec;
endusec = end.tv_sec * 1000000 + end.tv_usec;
elapsed = (endusec - startusec) / 1000000.0;
printf("sort took %.4f seconds\n", elapsed);
for (int i=0; i<NUMNUM; i++) {
fprintf(stderr, "%ld\n", snums[i]);
}
return 0;
}

程序利用多个线程来并行地排序数组的某一个部分,然后主线程来合并各个线程的排序结果,我们比较一下它和单线程排序所花去的时间:

1
2
3
4
5
6
7
8
9
10
11
12
13
14
15
16
17
18
19
20
21
22
23
24
25
26
27
28
29
30
31
32
33
34
35
36
37
38
39
40
41
42
43
#include <stdio.h>
#include <stdlib.h>
#include <sys/time.h>

#define NUMNUM 8000000L

long nums[NUMNUM];

int cmplong(const void *arg1, const void *arg2) {
long l1 = *(long *)arg1;
long l2 = *(long *)arg2;

if (l1 == l2)
return 0;
else if (l1 < l2)
return -1;
else
return 1;
}

int main(void) {
struct timeval start, end;
long long startusec, endusec;

srandom(1);
for (long long i=0; i<NUMNUM; i++) {
nums[i] = random();
}

gettimeofday(&start, NULL);

qsort(nums, NUMNUM, sizeof(long), cmplong);

gettimeofday(&end, NULL);

startusec = start.tv_sec * 1000000 + start.tv_usec;
endusec = end.tv_sec * 1000000 + end.tv_usec;

double elapsed = (endusec - startusec) / 1000000.0;
printf("normal sort time: %.4f\n", elapsed);

return 0;
}
1
$ ./barrier_sort 2>/dev/null
sort took 0.7819 seconds

# zach41 @ zach41-H81M-S1 in ~/Desktop/UNIX-Demos/pthread on git:master x [14:02:50] 
$ ./norm_sort 2>/dev/null
normal sort time: 1.7947

可以看到多线程排序所有时间明显低于单线程排序。

线程特定数据

线程特定数据,也称为线程私有数据,是存储和查询某个特定线程相关数据的一种机制。一个线程可以访问所属进程的整个地址空间,除了使用寄存器以外,一个线程没有办法阻止另一个线程访问它的数据,线程特定数据也不例外。虽然底层的实现部分并不能阻止这种访问能力,但是管理线程特定数据的函数可以提高线程间数据独立性,使得线程不太容易访问到其他线程的线程特定数据。

具体的可以看用线程处理客户请求中的线程特定数据

Zach的博客

守护进程

| 阅读次数

守护进程

守护进程(daemon)是生存期长的一种进程。它们常常在系统引导装入时启动,在系统关闭时才终止。它们没有控制终端,所以它们一直在后台运行。UNIX系统中有很多守护进程,它们执行日常事务活动。

编写守护进程

  1. 首先调用umask设置文件模式创建屏蔽字。如果守护进程要创建文件,那么它可能要设定特定的权限,继承而来的文件模式创建屏蔽字可能会屏蔽某些权限。一般调用为umask(0)。
  2. 调用fork保证守护进程不是一个进程的组长进程,同时获得一个新的进程ID。
  3. 调用setsid创建一个会话
  4. 再次调用fork以保证当前进程不是会话的首进程,以防止日后打开一个终端时获得一个控制终端。
  5. 更改当前工作目录为根目录。这样可以防止某些文件系统不能被卸载。
  6. 关闭不需要的文件系统,通知把标准输入、标准输出和标准错误重定向到/def/null,这样可以防止某些利用这些描述符的库函数不会得不到描述符而出错。

一个将普通进程转换成守护进程的函数:

1
2
3
4
5
6
7
8
9
10
11
12
13
14
15
16
17
18
19
20
21
22
23
24
25
26
27
28
29
30
31
32
33
34
35
36
37
38
39
40
41
42
43
44
45
46
47
48
49
50
51
52
53
54
55
56
57
58
59
60
61
62
63
64
65
66
67
68
void daemonize(const char *cmd) {
int fd0, fd1, fd2;
pid_t pid;
struct rlimit rl;
struct sigaction sa;

umask(0);

if (getrlimit(RLIMIT_NOFILE, &rl) < 0) {
perror(" getrlimit error");
exit(-1);
}

// become a session leader to lose controlling TTY
if ((pid = fork()) < 0) {
perror("fork error");
exit(-1);
} else if (pid > 0) {
/* parent */
exit(0);
}
setsid();

/* fork again, ensure future opens won;t allocate controlling TTY */
sa.sa_handler = SIG_IGN;
sigemptyset(&sa.sa_mask);
sa.sa_flags = 0;
if (sigaction(SIGHUP, &sa, NULL) < 0) {
fprintf(stderr, "%s: can't ignore SIGHUP", cmd);
perror("");
exit(-1);
}

if ((pid = fork()) < 0) {
perror("fork error");
exit(-1);
} else if (pid > 0) {
exit(0);
}

/* Change the current working directory to the root
so we won;t prevent file systems from being unmounted.
*/

if (chdir("/") < 0) {
perror("chdir error");
exit(-1);
}

/* close all open file descriptors */
if (rl.rlim_max == RLIM_INFINITY) {
rl.rlim_max = 1024;
}
for (int i=0; i<rl.rlim_max; i++) {
close(i);
}

/* attach stdin, stdout, stderr to /dev/null */
fd0 = open("/dev/null", O_RDWR);
fd1 = dup(0);
fd2 = dup(0);

/* Initialize log file */
openlog(cmd, LOG_CONS, LOG_DAEMON);
if (fd0 != 0 || fd1 != 1 || fd2 != 2) {
syslog(LOG_ERR, "unexpected file descriptors %d %d %d", fd0, fd1, fd2);
exit(1);
}
}

syslog

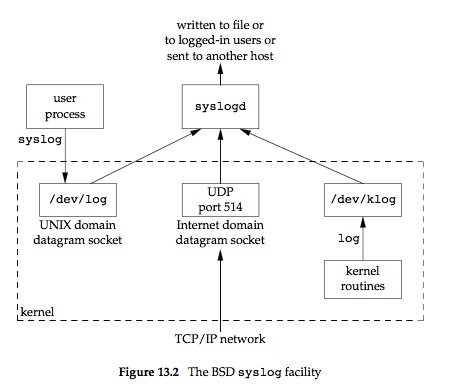
守护进程的一个问题是如何处理出错信息,因为它没有控制终端,所以不能简单的写到标准错误上。可以利用syslog来记录守护进程的错误信息。syslog的组织结构如下:

syslog.png

有以下三种产生日志消息的方法:

  1. 内核例程调用log函数。
  2. 大多数用户进程(守护进程)调用syslog函数产生日志消息
  3. 无论一个用户进程是否在此主机上,都可将日志消息发向UDP端口514.

syslog的接口为:

1
2
3
4
5
6
7
8
9
#include <syslog.h>

void openlog(const char *ident, int option, int facility);

void syslog(int priority, const char *fmt, ...);

viud closelog(void);

int setlogmask(int maskpri);

文件锁和单实例守护进程

fcntl函数可以用来给一整个文件或者是文件的部分区域加建议锁。文件锁分为shared lock和execlusive lock,一个文件可以加多个shared lock,就如同可以有多个读者一样,但是一个文件只能加一个exclusive loc,而且文件要么加shared lock要么加exclusive lock,不能同时加两个锁。

在设置文件锁时,需要传入flock结构的指针。

1
2
3
4
5
6
7
8
9
10
11
12
struct flock {
...
short l_type; /* Type of lock: F_RDLCK,
F_WRLCK, F_UNLCK */

short l_whence; /* How to interpret l_start:
SEEK_SET, SEEK_CUR, SEEK_END */

off_t l_start; /* Starting offset for lock */
off_t l_len; /* Number of bytes to lock */
pid_t l_pid; /* PID of process blocking our lock
(F_GETLK only) */

...
};

需要说明的是,如果l_len被设置成0,那么从l_whence和l_start指定的位置开始到文件的末尾都被加上了文件锁。

fcntl有三种和文件锁有关的操作:

  1. F_GETLK:flock参数表示调用者这时候想要加上的锁,如果锁能被加上,那么fcntl并没有实际上锁,它将l_type置为F_UNLCK。如果不能上锁,那么就把文件锁的相关信息填入flock参数中。
  2. F_SETLK:给文件设置锁,如果另外一个进程已经持有锁而使得当前进程无法获得锁,返回-1。
  3. F_SETLKW:和F_SETLCK一样,但是当锁无法获得时,调用进程被阻塞,直至锁可用。

需要注意一点是,当对应的文件被关闭时,其上的锁被自动释放,子进程也无法继承父进程的锁。当拥有锁的进程终止时,锁也被自动释放。

flock接口也可以获得文件锁(另外一种文件锁,不一定和上文的文件锁兼容),不同的是,子进程可以继承父进程的文件锁,但是子进程得到的只是文件锁的引用,即如果子进程释放文件锁,那么父进程的文件锁也被释放。具体可以参看flock(2)的manual。

我们利用fcntl函数设置文件锁,只有当前运行的守护进程拥有文件锁,之后尝试启动的守护进程都将无法得到该文件锁,从而无法启动,于是就可以达到单实例守护进程的目的。

1
2
3
4
5
6
7
8
9
10
11
12
13
14
15
16
17
18
19
20
21
22
23
24
25
26
27
28
29
30
31
32
33
34
35
36
37
38
39
40
41
42
43
44
45
46
47
48
49
50
51
52
53
54
55
56
57
58
59
60
61
62
63
64
65
66
67
68
69
70
71
72
73
74
75
76
77
78
79
80
81
82
83
84
85
86
87
88
89
90
91
92
93
94
95
96
97
98
99
100
101
102
103
104
105
106
107
108
109
110
111
112
113
114
115
116
117
118
119
120
121
122
123
124
125
126
127
128
129
130
131
132
133
134
135
136
137
138
139
140
141
142
143
144
145
146
147
148
149
150
151
152
#include <syslog.h>
#include <signal.h>
#include <unistd.h>
#include <sys/resource.h>
#include <fcntl.h>
#include <sys/stat.h>
#include <stdio.h>
#include <stdlib.h>
#include <errno.h>
#include <string.h>
#include <pthread.h>

#define LOCKFILE "/var/run/daemon.pid"
#define LOCKMODE (S_IRUSR | S_IWUSR | S_IRGRP | S_IROTH)

sigset_t mask;

void reread() {
// re-read configuration

}

int lockfile(int fd) {
struct flock fl;

fl.l_start = 0;
fl.l_len = 0;
fl.l_whence = SEEK_SET;
fl.l_type = F_WRLCK;

return fcntl(fd, F_SETLK, &fl);
}

void daemonize(const char *cmd) {
int fd0, fd1, fd2;
pid_t pid;
struct rlimit rl;
struct sigaction sa;

umask(0);

if (getrlimit(RLIMIT_NOFILE, &rl) < 0) {
perror(" getrlimit error");
exit(-1);
}

// become a session leader to lose controlling TTY
if ((pid = fork()) < 0) {
perror("fork error");
exit(-1);
} else if (pid > 0) {
/* parent */
exit(0);
}
setsid();

/* fork again, ensure future opens won;t allocate controlling TTY */
sa.sa_handler = SIG_IGN;
sigemptyset(&sa.sa_mask);
sa.sa_flags = 0;
if (sigaction(SIGHUP, &sa, NULL) < 0) {
fprintf(stderr, "%s: can't ignore SIGHUP", cmd);
perror("");
exit(-1);
}

if ((pid = fork()) < 0) {
perror("fork error");
exit(-1);
} else if (pid > 0) {
exit(0);
}

/* Change the current working directory to the root
so we won;t prevent file systems from being unmounted.
*/

if (chdir("/") < 0) {
perror("chdir error");
exit(-1);
}

/* close all open file descriptors */
if (rl.rlim_max == RLIM_INFINITY) {
rl.rlim_max = 1024;
}
for (int i=0; i<rl.rlim_max; i++) {
close(i);
}

/* attach stdin, stdout, stderr to /dev/null */
fd0 = open("/dev/null", O_RDWR);
fd1 = dup(0);
fd2 = dup(0);

/* Initialize log file */
openlog(cmd, LOG_CONS, LOG_DAEMON);
if (fd0 != 0 || fd1 != 1 || fd2 != 2) {
syslog(LOG_ERR, "unexpected file descriptors %d %d %d", fd0, fd1, fd2);
exit(1);
}

}

int already_running(void) {
int fd;
char buf[16];

fd = open(LOCKFILE, O_RDWR | O_CREAT, LOCKMODE);
if (fd < 0) {
syslog(LOG_ERR, "can't open %s: %s", LOCKFILE, strerror(errno));
exit(1);
}

if (lockfile(fd) < 0) {
if (errno == EACCES || errno == EAGAIN) {
/* already has one daemon running */
close(fd);
return 1;
}
syslog(LOG_ERR, "can't lock %s: %s", LOCKFILE, strerror(errno));
exit(1);
}
ftruncate(fd, 0);
sprintf(buf, "%ld", (long)getpid());
write(fd, buf, strlen(buf) + 1);
return 0;
}

int main(int argc, char **argv) {

int err;
pthread_t tid;
char *cmd;
struct sigaction sa;

if ((cmd = strrchr(argv[0], '/')) == NULL)
cmd = argv[0];
else
cmd++;

daemonize(cmd);

if (already_running()) {
syslog(LOG_ERR, "daemon already running");
exit(1);
}

/* do daemon's work */
while (1);

exit(0);
}

在运行一次之后,我们尝试在此运行,查看/var/log/syslog得到:

1
Oct 23 17:00:35 localhost a.out: daemon already running

使用sigwait以及多线程处理信号

守护进程一般在接受到SIGHUP信号后重新读区其配置文件。这是因为守护进程没有控制终端,它永远不会收到来自终端的SIGHUP信号,那么就可以将SIGHUP信号重复使用,收到该信号就重新读取配置文件。

一个例子:

1
2
3
4
5
6
7
8
9
10
11
12
13
14
15
16
17
18
19
20
21
22
23
24
25
26
27
28
29
30
31
32
33
34
35
36
37
38
39
40
41
42
43
44
45
46
47
48
49
50
51
52
53
54
55
56
57
58
59
60
61
62
63
64
65
66
67
68
69
70
71
72
73
74
75
76
77
78
79
80
81
82
83
84
85
86
87
88
89
90
91
92
93
94
95
96
97
98
99
100
101
102
103
104
105
106
107
108
109
110
111
112
113
114
115
116
117
118
119
120
121
122
123
124
125
126
127
128
129
130
131
132
133
134
135
136
137
138
139
140
141
142
143
144
145
146
147
148
149
150
151
152
153
154
155
156
157
158
159
160
161
162
163
164
165
166
167
168
169
170
171
172
173
174
175
176
177
178
179
180
181
182
183
184
185
186
187
188
189
190
191
192
193
194
195
196
197
198
199
200
#include <syslog.h>
#include <signal.h>
#include <unistd.h>
#include <sys/resource.h>
#include <fcntl.h>
#include <sys/stat.h>
#include <stdio.h>
#include <stdlib.h>
#include <errno.h>
#include <string.h>
#include <pthread.h>

#define LOCKFILE "/var/run/daemon.pid"
#define LOCKMODE (S_IRUSR | S_IWUSR | S_IRGRP | S_IROTH)

sigset_t mask;

void reread() {
// re-read configuration

}

int lockfile(int fd) {
struct flock fl;

fl.l_start = 0;
fl.l_len = 0;
fl.l_whence = SEEK_SET;
fl.l_type = F_WRLCK;

return fcntl(fd, F_SETLK, &fl);
}

void daemonize(const char *cmd) {
int fd0, fd1, fd2;
pid_t pid;
struct rlimit rl;
struct sigaction sa;

umask(0);

if (getrlimit(RLIMIT_NOFILE, &rl) < 0) {
perror(" getrlimit error");
exit(-1);
}

// become a session leader to lose controlling TTY
if ((pid = fork()) < 0) {
perror("fork error");
exit(-1);
} else if (pid > 0) {
/* parent */
exit(0);
}
setsid();

/* fork again, ensure future opens won;t allocate controlling TTY */
sa.sa_handler = SIG_IGN;
sigemptyset(&sa.sa_mask);
sa.sa_flags = 0;
if (sigaction(SIGHUP, &sa, NULL) < 0) {
fprintf(stderr, "%s: can't ignore SIGHUP", cmd);
perror("");
exit(-1);
}

if ((pid = fork()) < 0) {
perror("fork error");
exit(-1);
} else if (pid > 0) {
exit(0);
}

/* Change the current working directory to the root
so we won;t prevent file systems from being unmounted.
*/

if (chdir("/") < 0) {
perror("chdir error");
exit(-1);
}

/* close all open file descriptors */
if (rl.rlim_max == RLIM_INFINITY) {
rl.rlim_max = 1024;
}
for (int i=0; i<rl.rlim_max; i++) {
close(i);
}

/* attach stdin, stdout, stderr to /dev/null */
fd0 = open("/dev/null", O_RDWR);
fd1 = dup(0);
fd2 = dup(0);

/* Initialize log file */
openlog(cmd, LOG_CONS, LOG_DAEMON);
if (fd0 != 0 || fd1 != 1 || fd2 != 2) {
syslog(LOG_ERR, "unexpected file descriptors %d %d %d", fd0, fd1, fd2);
exit(1);
}

}

int already_running(void) {
int fd;
char buf[16];

fd = open(LOCKFILE, O_RDWR | O_CREAT, LOCKMODE);
if (fd < 0) {
syslog(LOG_ERR, "can't open %s: %s", LOCKFILE, strerror(errno));
exit(1);
}

if (lockfile(fd) < 0) {
if (errno == EACCES || errno == EAGAIN) {
/* already has one daemon running */
close(fd);
return 1;
}
syslog(LOG_ERR, "can't lock %s: %s", LOCKFILE, strerror(errno));
exit(1);
}
ftruncate(fd, 0);
sprintf(buf, "%ld", (long)getpid());
write(fd, buf, strlen(buf) + 1);
return 0;
}

void *thr_fn(void *arg) {
int err, signo;
for(;;) {
err = sigwait(&mask, &signo);
if (err != 0) {
syslog(LOG_ERR, "sigwait failed");
exit(1);
}

switch (signo) {
case SIGHUP: {
syslog(LOG_INFO, "Re-reading configuration file");
reread();
break;
}
case SIGTERM: {
syslog(LOG_INFO, "got SIGTERM; exiting");
exit(0);
}
default:
syslog(LOG_INFO, "unexpected signal %d\n", signo);
}
}

return 0;
}

int main(int argc, char **argv) {

int err;
pthread_t tid;
char *cmd;
struct sigaction sa;

if ((cmd = strrchr(argv[0], '/')) == NULL)
cmd = argv[0];
else
cmd++;

daemonize(cmd);

if (already_running()) {
syslog(LOG_ERR, "daemon already running");
exit(1);
}

/*
Restore SIGHUP default and block all signals
*/

sa.sa_handler = SIG_DFL;
sigemptyset(&sa.sa_mask);
sa.sa_flags = 0;
if (sigaction(SIGHUP, &sa, NULL) < 0) {
syslog(LOG_ERR, "%s: can't restore SIGHUP default", cmd);
exit(1);
}
sigfillset(&mask);
if ((err = pthread_sigmask(SIG_BLOCK, &mask, NULL)) != 0) {
syslog(LOG_ERR, "SIG_BLOCK error");
exit(1);
}

err = pthread_create(&tid, NULL, thr_fn, 0);
if (err != 0) {
syslog(LOG_ERR, "can't create thread");
}

/* do daemon's work */
while (1);

exit(0);
}

我们将SIGHUP的处理函数恢复的到默认之后(否则进程忽略这个信号,sigwait永远不会见到它),阻塞所有信号,然后创建一个线程处理信号。该线程的唯一工作是等待SIGHUP和SIGTERM。当收到SIGHUP是就重新读取配置文件。

Zach的博客

进程关系

| 阅读次数

终端登录

对于终端设备登陆,系统管理员首先创建一个配置文件,每一个终端设备在配置文件中占一行。当系统自举时,内核创建进程ID为1的进程,即init进程。init进程使系统进入多用户模式,它读取终端设备的配置文件,对灭一个允许登录的终端设备,它调用一次fork,然后用生成的子进程调用exec,执行getty程序。而getty则对终端设备调用open函数,以读写方式打开终端。如果设备时调制解调器,则open会在驱动中滞留,知道用户拨号调制解调器,并且线路被接通。一旦设备被打开,文件描述符0,1,2就被舍知道该设备,然后getty输入login:之类的信息,等到用户输入用户名。

一旦用户输入了用户名,那么getty的工作就完成了,然后它调用login程序,提示用户输入密码,如果用户输入正确,那么:

  • 将当前工作目录改为用户的起始目录。
  • 调用chown更改终端的所有权,是登录用户称为它的所有者
  • 更改终端设备的访问权限为当前用户可读写
  • 调用setgid和initgroups设置进程的组ID
  • 用login得到的所有信息初始化环境:HOME、shell、USERNAME、LOGNAME以及一个系统默认路径(PATH)。
  • login进程更改为登录用户的用户ID(setuid)并调用该用户的登录shell。

执行流程示意如下:

login_shell.png

注意一点,init是以特权模式运行的,login因为也在特权模式下运行,setuid会改变进程的3个用户ID:实际用户ID、有效用户ID和保存的设置用户ID。

当用户登出时,shell进程被终止,于是init进程得到通知,它会对终端设备重复上述过程。

网络登录

网络登录和通过串行终端登录的不同之处在于init进程无法知道会有多少个用户通过网络登录,它也就无法通过预先配置终端文件生成进程的方式来等到用户登录。

当用户通过网络来登录时,守护进程inetd(linux下时xinetd)会收到请求,它fork一个进程来处理这个连接请求。一个telnet登录示意如下:

telnet_login.png

telnetd进程打开一个伪终端设备,并用fork分成两个进程,父进程负责处理网络请求,子进程则执行login。父进程和子进程通过伪终端相连接。

需要理解的重点是:我们得到一个登录shell时,其标准输入、标准输出和标准错误要么连接到一个终端设备,要么连接到一个伪终端设备。

进程组

进程组是一个或者多个进程的集合。通常,它们是在同一作业中结合起来的,同一进程组的各个进程收到来自统一终端的各种信号。每个进程组有一个唯一的进程组ID。每一个进程组有一个组长进程,组长进程的进程ID即进程组ID。需要注意的是,如果组长进程退出了,进程组仍然存在,而且进程组ID不变,只有当进程组内所有的进程都退出了,那么进程组的生命周期才算结束。

相关接口:

1
2
3
4
5
6
#include <unistd.h>
pid_t getpgrp(); /* 返回当前进程组ID*/

pid_t getpgid(pid_t pid); /* 返回进程ID为pid的进程组ID,pid = 0时和`getpgrp`等效 */

int setpgid(pid_t pid, pid_t pgid); /* 加入一个现有进程组或创建一个新进程组,进程职能为它自己和其子 进程设置进程组 */

会话

会话(session)是一个或者多个进程组的集合。通常是由shell的管道将几个进程变成一组。

1
2
3
#include <unistd.h>

pid_t setsid();

setsid函数建立一个新的会话。函数调用成功的前提是调用进程不是一个进程组的组长进程。如果调用成功:

  • 进程变成新会话进程的首进程(session leader)
  • 该进程称为一个新的进程组的组长进程,进程组ID为当前进程ID,会话ID也为当前进程ID。
  • 该进程没有控制终端,如果在调用setsid之前有控制终端,这个联系也被切断。
1
2
3
#include <unistd.h>

pid_t getsid(pid_t pid);

getsid函数返回对应进程的会话首进程的进程组ID,如果pid == 0那么返回当前进程的对应值。出于安全考虑,如果pid不属于调用者所在的会话,那么调用失败。

控制终端

会话和进程组还有一些其他特性:

  • 一个会话可以有一个控制终端(controlling terminal),这通常是终端或者伪终端设备。
  • 与控制终端建立连接的会话首进程称为控制进程。
  • 一个会话的进程组可以被分割为一个前台进程组(foreground process group)和若干个后台进程组(background process group)。
  • 如果一个会话有一个控制终端,则它有一个前台进程组
  • 中断键(Ctrl-C)、退出键(Ctrl-\)都被发送至前台进程组的所有进程。
  • 如果终端断开连接,则挂断信息发送至控制进程。

特性示意:

session_property.png

有时候后台进程组也需要和终端交互,这时候后台进程组可以打开终端设备。当然用户也可以配置终端以防止后台进程和终端进行交互。

1
2
3
4
5
#include <unistd.h>

pid_t tcgetpgrp(int fd); /* 返回前台进程组ID,它与fd上打开的终端相关联 */
int tcsetpgrp(int fd, pid_t pgrpid); /* 将前台进程组设置为pgrpid,fd必须饮用该会话的控制终端 */
pid_t tcgetsid(int fd); /* 得到控制控端的会话首进程的会话ID */

孤儿进程组

POSIX.1将孤儿进程组定义为:该组的成员的父进程要么是该组的一个成员,要么不是改组所属会话的成员。POSIX.1要求向新的孤儿进程组中处于停滞状态的每一个成员发送挂断信号(SIGHUP),接着又向其发送继续信号(SIGCONT)。

一个孤儿进程的例子如下:

1
2
3
4
5
6
7
8
9
10
11
12
13
14
15
16
17
18
19
20
21
22
23
24
25
26
27
28
29
30
31
32
33
34
35
36
37
38
#include <stdio.h>
#include <signal.h>
#include <unistd.h>
#include <errno.h>
#include <stdlib.h>

static void sig_hup(int signo) {
printf("SIGHUP received, pid=%ld\n", (long)getpid());
}

static void pr_ids(char *name) {
printf("%s: pid = %ld, ppid = %ld, pgrp = %ld, tpgrp = %ld\n",
name, (long)getpid(), (long)getppid(), (long)getpgrp(), (long)tcgetpgrp(STDIN_FILENO));
fflush(stdout);
}

int main(int argc, char *argv[])
{

char c;
pid_t pid;

pr_ids("parent");
if ((pid = fork()) < 0) {
perror("fork error");
exit(-1);
} else if (pid > 0) {
sleep(5);
} else {
pr_ids("child");
signal(SIGHUP, sig_hup);
kill(getpid(), SIGTSTP);
pr_ids("child");
if (read(STDIN_FILENO, &c, 1) != 1) {
printf("read error %d on controlling TTY\n", errno);
}
}
return 0;
}

子进程设置SIGHUP信号的处理函数后将自己停止,当父进程退出后,子进程变成一个新的孤儿进程组的成员,于是系统向这个进程组发送SIGHUP信号,子进程的处理函数被触发,之后子进程又收到SIGCONT信号,程序继续执行。

输出:

1
➜  ~ ./a.out 
parent: pid = 16564, ppid = 4501, pgrp = 16564, tpgrp = 16564
child: pid = 16565, ppid = 16564, pgrp = 16564, tpgrp = 16564
SIGHUP received, pid=16565                                                                                                                                                                                                                    
child: pid = 16565, ppid = 1, pgrp = 16564, tpgrp = 4501
read error 5 on controlling TTY

由于子进程是孤儿进程组,它如果尝试向终端读取数据,就会出错。

Zach的博客

进程控制

| 阅读次数

进程标识

每一个进程都有一个非负的进程ID来唯一标识自己,虽然ID唯一,但是ID可以复用,如果一个进程被销毁了,那么它的ID就可以被新创建的进程所使用。除了进程ID,进程还有其他一些标识符:

  • uid:进程的实际用户ID
  • eid:进程的有效用户ID
  • ppid:进程的父亲进程ID
  • gid:进程的实际组ID
  • egid:进程的有效组ID

获得这些标识的接口:

1
2
3
4
5
6
7
8
9
10
11
12
13
#include <unistd.h>

pid_t getpid();

pid_t getppid();

uid_t getuid();

uid_t geteuid();

gid_t getgid();

gid_t getegid();

uid与euid,gid与egid

这两组值用来管理进程的访问权限。这里只说明uid和euid,gid和egid作用类似,只不过它们作用于进程组。

  • uid指的是登录用户的用户ID
  • euid是进程用来决定我们对资源的访问权限,一般实际用户ID等于有效用户ID,当设置用户ID时,有效用户ID等于文件的所有者。

举一个例子,如果一个文件的所有者是root,同时该文件被设置了用户ID,即用ls命令得到了如下的结果

1
$ ls -l system_secure
-rwsrwxr-x 1 root zach41 8720 10月 20 16:07 system_secure

那么当用户zach41执行这个文件时,在执行期间进程获得了文件拥有者root的权限。

我们可以用setuid来设置实际用户ID和有效用户ID。

1
2
3
4
5
#include <unistd.h>

int setuid(uid_t uid);

int setgid(gid_t gid);

设置权限的规则如下:

  1. 如果进程具有超级用户权限,那么setuid讲实际用户ID、有效用户ID、保存的用户ID都设置成uid。
  2. 如果进程不具有超级用户权限,但是uid等于实际用户ID或者保存的用户ID,那么setuid讲有效用户ID设置成uid。不更改实际用户ID和保存的用户ID。
  3. 如果上述规则都不满足,则errno设置成EPERM,并返回-1。

另外两个函数:

1
2
3
4
5
#include <unistd.h>

int seteuid(uid_t uid);

int setegid(gid_t gid);

对于一个特权用户来说,seteuid可以将有效用户ID设置成uid,而setuid更改所有的3个用户ID。对于一个非特权用户,可以利用该函数讲有效用户ID设置为实际用户ID或者保存的设置用户ID。

进程创建与销毁

Fork

可以用fork来创建一个进程,用exit来销毁一个进程。

1
2
3
4
5
6
#include <unistd.h>

pid_t fork();

#include <stdlib.h>
void exit();

fork函数返回两次,在父进程中函数返回值为新生成的子进程的pid,在子进程中返回值为0。一个比较典型的fork调用范式为:

1
2
3
4
5
6
7
8
9

if ((pid = fork) < 0) {
/* fork error*/
...
} else if (pid == 0) {
/* child process*/
} else {
/* parent process*/
}

fork通常有一下两种用法:

  1. 一个父进程希望自己复制自己,使父进程和子进程同时执行不同的代码段。这在网络服务进程中比较常见。
  2. 一个进程需要执行一个不同的程序。这对shell是常见的情况。在这种情况下,子进程从fork中返回后立即调用exec函数。

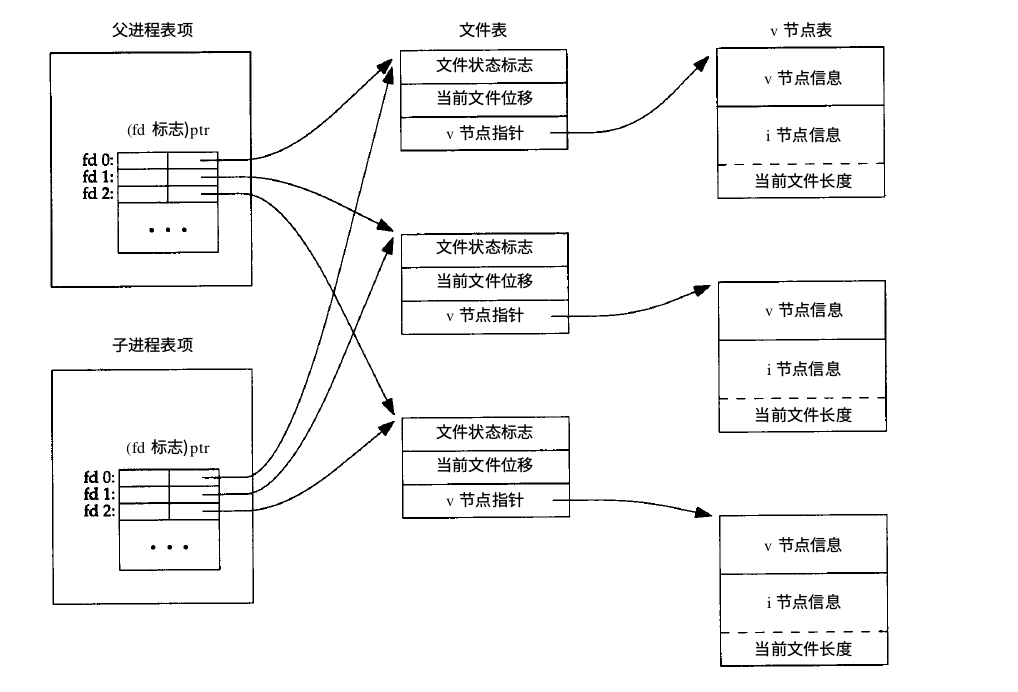
fork的一个特性是,子进程复制父进程所有打开的描述符,这里只是复制文件描述符,父进程和子进程共享文件表项。一个典型的fork之后的文件描述图示:

file_shared.png

除了打开的文件之外,子进程还继承了父进程的:

  • 实际用户ID、实际组ID、有效用户ID、有效组ID
  • 附属组ID
  • 进程组ID
  • 会话ID
  • 控制终端
  • 设置用户ID标识和设置组ID标志
  • 当前工作目录
  • 根目录
  • 文件模式创建屏蔽字
  • 信号屏蔽和安排
  • 对任一打开文件描述符的执行时关闭close-on-exec标志
  • 环境
  • 连接的共享存储段
  • 存储映像

一个fork的演示例子:

1
2
3
4
5
6
7
8
9
10
11
12
13
14
15
16
17
18
19
20
21
22
23
24
25
26
27
28
29
30
31
32
33
#include <stdio.h>
#include <unistd.h>

int globalvar = 6;
char buf[] = "a write to stdout\n";

int main(int argc, char *argv[])
{

int var;
pid_t pid;

var = 88;

if (write(STDOUT_FILENO, buf, sizeof(buf) - 1) != sizeof(buf) - 1) {
perror("write error");
return -1;
}
printf("before fork\n");

if ((pid = fork()) < 0) {
perror("fork error");
return -1;
} else if (pid == 0) {
globalvar++;
var++;
} else {
sleep(2);
}

printf("pid = %ld, globalvar = %d, var = %d\n", (long)pid, globalvar, var);

return 0;
}

输出结果:

1
$ ./a.out 
a write to stdout
before fork
pid = 0, globalvar = 7, var = 89
pid = 11510, globalvar = 6, var = 88

$ ./a.out > fork_buf.out

a write to stdout
before fork
pid = 0, globalvar = 7, var = 89
before fork
pid = 11589, globalvar = 6, var = 88

父进程在执行fork后主动睡眠,让子进程先执行(实际上这在有的时候也不能保证,需要用更高级的方法),可以看到子进程输出的globalvar和var都加了1,而父进程没有。

如果我们重定向了标准输出,那么就会看到before fork被输出了两次,这是因为当标准输出和一个文件相关联时它是全缓冲的,在fork之前,字符串被存放到缓冲区中,fork函数导致父进程的数据空间被复制到子进程中,标准输出的缓冲区也同样被复制,这样当进程结束时,缓冲区被清洗,于是就有了两次brefore fork的输出。在第一个例子中,由于标准输出和一个终端相关联,它是行缓冲的,所以只输出了一次before fork。

Exit

进程有5种正常终止以及3种异常终止方式。

正常终止方式:

  1. 在main函数中调用return语句
  2. 调用exit函数,其操作包括调用各个终止函数(由atexit函数注册),然后关闭所有的标准I/O流。在main函数里调用return语句等效于调用exit函数。
  3. 调用_exit或者_Exit函数。函数不运行各个终止函数,也不冲洗I/O流,但是它关闭所有打开的文件流。
  4. 进程的最后一个线程在其启动例程中执行return语句,但是该线程的返回值不用作进程的返回值。当最后一个线程中其启动例程返回时,该进程以终止状态0返回。
  5. 进程的最后一个线程调用pthread_exit函数,进程的终止状态为0。

异常终止方式:

  1. 调用abort函数
  2. 进程收到信号
  3. 最后一个线程对”取消”请求作出响应。

进程终止函数由atexit函数注册:

1
2
3
#include <stdlib.h>

int atexit(void (*func)(void));

一个例子:

1
2
3
4
5
6
7
8
9
10
11
12
13
14
15
16
17
18
19
20
21
22
23
24
25
26
27
28
29
30
31
#include <stdio.h>
#include <stdlib.h>

#include <unistd.h>

static void clear_onexit1() {
printf("On exit1\n");
}

static void clear_onexit2() {
printf("On exit2\n");
}

int main(void) {
printf("At Exit Demo!\n");

if (atexit(clear_onexit1) != 0) {
fprintf(stderr, "can't register `clear_onexit1`");
return -1;
}
if (atexit(clear_onexit1) != 0) {
fprintf(stderr, "can't register `clear_onexit1`");
return -1;
}
if (atexit(clear_onexit2) != 0) {
fprintf(stderr, "can't register `clear_onexit1`");
return -1;
}
exit(0);
/* _exit(0); */
}

输出:

1
$ ./a.out 
At Exit Demo!
On exit2
On exit1
On exit1

可以看到一个函数可以多次被注册,而且执行的顺序和注册的顺序相反。

在一个进程退出后,如果它有子进程,那么它的所有子进程由init进程收养。而如果一个子进程在退出后,父进程没有调用wait或者waitpid去获取子进程的退出状态,那么子进程就会成为僵尸进程。僵尸进程的地址空间被内核收回,所有打开的文件也被关闭,但是内核保存它的终止状态、进程ID以及CPU时间总量。

wait & waitpid

上一小节说到如果子进程的终止状态没有被父进程通过wait或者waitpid得到,那么子进程就会变成僵尸进程。这两个函数的原型如下:

1
2
3
4
5
#include <sys/wait.h>

pid_t wait(int *statloc);

pid_t waitpid(pid_t pid, int *statloc, int options);

wait等待任意一个子进程终止,如果没有子进程,那么函数出错。子进程的终止状态被存入statloc指向的内存地址。

waitpid可以等待特定进程终止。options可以进一步控制函数的行为:

  • WCONTINUED:若实现支持作业控制,那么由pid指定的任一子进程在停止后已经继续,但其状态未报告,则返回其状态
  • WNOHANG:若由pid指定的子进程不是立即调用,则waitpid不阻塞,返回值为0。
  • WUNTRACED:若实现支持作业控制,而由pid指定的任一子进程已处于停止状态,并且其状态自停止以来还未报告,则返回其状态。WIFSTOPPED宏确定返回值是否对应于一个停止的子进程。

可以利用以下宏来检查返回的状态值:

  • WIFEXITED(status):若正常终止,返回值为真,此时可执行WEXITSTATUS(status),获取子进程传送给exit或者_exit参数的低8位。
  • WIFSIGNALED(status):若为异常终止子进程,返回真。此时可以执行WTERMSIG(status)获取终止的信号值,而且如果有产生终止进程的core文件,那么WCOREDUMP(status)返回真。
  • WIFSTOPPED(status):若为当前暂停子进程的返回的状态,那么为真。此时可以执行WSTOPSIG(status)得到使得子进程暂停的信号。
  • WIFCONTINUED(status):若在作业控制暂停后已经继续的子进程返回了状态,那么为真。

这里给一个waitpid的例子,同时也说明如何fork两次来让子进程在退出后不会变成僵尸进程。

1
2
3
4
5
6
7
8
9
10
11
12
13
14
15
16
17
18
19
20
21
22
23
24
25
26
27
28
29
30
31
32
33
#include <stdio.h>
#include <unistd.h>
#include <sys/wait.h>
#include <stdlib.h>

int main(void) {
pid_t pid;
int status;

if ((pid = fork()) < 0) {
perror("fork error");
return -1;
} else if (pid == 0) {
if ((pid = fork()) < 0) {
perror("fork error");
exit(-1);
} else if (pid > 0) {
exit(0);
}

sleep(5);
printf("parent process id: %ld\n", (long)getppid());
exit(0);
}

if (waitpid(pid, NULL, 0) != pid) {
perror("wait error");
return -1;
}

return 0;

}

输出:

1
# Zach @ ZachMacbook in ~/Desktop/UNIX_Demos/proc_demos on git:master x [22:26:56] 
$ ./a.out 

# Zach @ ZachMacbook in ~/Desktop/UNIX_Demos/proc_demos on git:master x [22:26:59] 
$ parent process id: 1


# Zach @ ZachMacbook in ~/Desktop/UNIX_Demos/proc_demos on git:master x

可以看到第二个子进程的父进程后来变成了init进程,init进程不断地调用wait来等待其子进程退出,故而第二个子进程不会成为僵尸进程。输出中看到了在./a.out后输出了shell提示符,这是因为父进程首先退出了。

竞争条件

前面提到过,在fork之后我们特意调用sleep函数然父进程睡眠,从而让子进程首先执行,这个方法是欠妥的,在一个非常繁忙的系统中,子进程不一定会先执行。这种不确定性就是进程的竞争条件。为了让子进程首先执行,我们需要一种特殊的手段。这里给出一种利用管道来实现进程同步的方法。

1
2
3
4
5
6
7
8
9
10
11
12
13
14
15
16
17
18
19
20
21
22
23
24
25
26
27
28
29
30
31
32
33
34
35
36
37
38
39
40
41
42
43
44
45
46
47
48
49
50
51
52
53
54
55
56
57
58
59
60
61
62
63
64
65
66
67
#include <stdio.h>
#include <unistd.h>
#include <sys/wait.h>
#include <stdlib.h>

int pipefd[2];

static void tell_wait();
static void tell_parent(pid_t);
static void tell_child(pid_t);
static void wait_child();
static void wati_parent();

static void charatatime(const char*);

int main(void) {
pid_t pid;

tell_wait();

if ((pid = fork()) < 0) {
perror("fork error");
exit(-1);
} else if (pid == 0) {
charatatime("output from child\n");
tell_parent(getppid());
} else {
wait_child();
charatatime("output from parent\n");
}
exit(0);
}

static void charatatime(const char* ptr) {
setbuf(stdout, NULL);
for (; *ptr != 0; ptr++) {
sleep(1);
putc(*ptr, stdout);
}
}

static void tell_wait() {
if (pipe(pipefd) < 0) {
perror("pipe error");
exit(-1);
}
}

static void tell_parent(pid_t pid) {
if (write(pipefd[1], "p", 1) != 1) {
perror("write error");
exit(-1);
}
}

static void wait_child() {
char c;
int n;
if ((n = read(pipefd[0], &c, 1)) < 0) {
perror("read error");
exit(-1);
}
if (c != 'p') {
fprintf(stderr, "wait child error");
exit(-1);
}
}
  • tell_wait初始化管道
  • wait_xxx:从管道读端读一个字符,如果写端没有写,那么进程被内核投入睡眠
  • tell_xxx:从管道写端写,唤醒被睡眠的读端进程吗,,从而达到进程同步的目的。

exec函数

exec函数族将fork的程序完全替换为另外一个程序。

1
2
3
4
5
6
7
8
9
10
#include <unistd.h>

int execl(const char* pathname, const char *arg0, ... /* (char *)0*/);
int execv(const char *pathname, char *const argv[]);
int ececle(const char *pathname, const char *arg0, ... /* (char *)0, char *const envp[]*/);
int execve(const char *pathname, char *const agrv[], char *const envp[]);
int execlp(const char *filename, const char *arg0, ... /* (char *)0 */);
int execvp(const char *filename, char const *argv[]);

int fexecve(int fd, char *const argv[], char *const envp[]);

exec函数族命名规则如下:

  • 含有l:程序参数以列表形式arg0, arg1, ... argn, (char *)0形式传入。
  • 含有v:程序参数以向量形式argv[]传入,数组最后一个元素为NULL。
  • 含有p:程序文件的路径名在环境变量PATH指定的路径下寻找
  • 含有e:程序的环境变量由参数envp提供,否则继承父进程的环境变量
  • 含有f:由文件描述符来代表程序文件。

解释器文件

解释器文件是一种文本文件,它的起始行格式为:

1
#! pathname [optional-arguement]

pathname一般为绝对路径。对这种文件的识别是由内核作为exec系统调用处理的一部分来完成的。内核使得调用exec函数的进程实际执行的不是这个解释器文件,而是在解释器文件第一行pathname所指定的文件,即解释器为pathname指定的文件,解释器文件为该文件。

一个例子:

1
2
3
4
5
6
7
8
9
10
11
12
13
14
15
16
17
18
19
20
21
22
23
24
#include <stdio.h>
#include <unistd.h>
#include <sys/wait.h>
#include <stdlib.h>

int main(int argc, char *argv[])
{

pid_t pid;

if ((pid = fork()) < 0) {
perror("fork error");
exit(-1);
} else if (pid == 0) {
if (execl("./testinterp", "testinterp", "myarg1", "MY ARG2", (char *)0) < 0) {
perror("execl error");
exit(-1);
}
}
if (waitpid(pid, NULL, 0) < 0) {
perror("waitpid error");
exit(-1);
}
return 0;
}
1
#! /home/ubuntu/Desktop/UNIX-Demos/proc_demos/echoall foo

echoall程序

1
2
3
4
5
6
7
8
9
10
11
12
13
14
15
16
17
18
19
#include <stdio.h>
#include <stdlib.h>

extern char **environ;

int main(int argc, char *argv[])
{

int i;
char **ptr;

for (i=0; i<argc; i++) {
printf("argv[%d] : %s\n", i, argv[i]);
}

/* for (ptr = environ; *ptr != 0; ptr++) { */
/* printf("%s\n", *ptr); */
/* } */
return 0;
}

输出:

1
argv[0] : /home/ubuntu/UNIX-Demos/proc_demos/echoall
argv[1] : foo
argv[2] : ./testinterp
argv[3] : myarg1
argv[4] : MY ARG2
ubuntu@VM-121-120-ubuntu:~/UNIX-Demos/proc_demos$

如一个awk脚本文件为:

1
#!/usr/bin/awk -f
# A awk example
BEGIN {
      for (i=0; i<ARGC; i++)
          printf "ARGV[%d] = %s\n", i, ARGV[i]
      exit	  
}

当我们执行./awkeample file1 file2时,命令以以下方式被执行:

1
/bin/awk -f /path/to/awkexample file1 file2

于是awk程序执行该脚本输出所有参数的值。

进程调度

可以通过nice值来调控进程优先级,进程的nice值范围在[0, 2*NZERO-1],nice值高的进程优先级越低(表示越友好)。进程可以通过nice函数接口来获得或者设置nice值,进程只能设置自己的nice值,而无法影响其他进程的nice值。

1
2
3
#include <unistd.h>

int nice(int incr);

incr参数被加到进程当前的nice值上,函数返回进程的nice值减去NZERO。所以如果函数返回-1,这时候函数调用可能是出错也可能调用正常,需要检查errno是否为0。incr置为0可以得到进程当前的nice减去NZERO的值。

系统的NZERO值可以通过sysconf函数得到。

进程时间

进程有三个时间:

  • 墙上时间:进程运行的总时间
  • 用户CPU时间:进程运行用户指令的时间
  • 系统CPU时间:程序调用系统调用后,内核执行系统服务所花去的时间。

任何一个进程都可以通过调用times函数获得它自己以及已终止的子进程的上述三个值。

1
2
3
4
5
6
7
8
9
10
#include <sys/times.h>

clock_t times(struct tms *buf);

struct tms {
clock_t tms_utime; // user cpu time
clock_t tms_stime; // system cpu time
clock_t tms_cutime; // user cpu time, terminated children
clock_t tms_cstime; // system cpu time, terminated childrem
}

times函数返回进程的墙上时钟。注意这里的所有值都是绝对时间,而我们需要的是相对时间,于是就应该在某一个时刻调用times获得一个初始值,在另外一个时刻调用times获得一个最终值,其差即为我们所需。

所有由此函数返回的clock_t值都用_SC_CLK_CTK(由sysconf函数返回的每秒时钟滴答数)转换成秒数。

一个例子:

1
2
3
4
5
6
7
8
9
10
11
12
13
14
15
16
17
18
19
20
21
22
23
24
25
26
27
28
29
30
31
32
33
34
35
36
37
38
39
40
41
42
43
44
45
46
47
48
49
50
51
52
53
54
55
56
57
58
59
60
61
62
63
64
65
66
67
68
69
70
71
72
73
74
75
76
77
78
79
80
81
#include <stdio.h>
#include <sys/times.h>
#include <unistd.h>
#include <sys/wait.h>
#include <stdlib.h>

void pr_exit(int);
void pr_times(clock_t, struct tms *, struct tms *);
void do_cmd(char *);

int main(int argc, char *argv[])
{

setbuf(stdout, NULL);
for (int i=1; i<argc; i++)
do_cmd(argv[i]);
return 0;
}

void pr_exit(int status) {
if (WIFEXITED(status)) {
printf("normal termination, exit status = %d\n", WEXITSTATUS(status));
} else if (WIFSIGNALED(status)) {
printf("abnormal termination, signal number = %d%s\n", WTERMSIG(status),
#ifdef WCOREDUMP
WCOREDUMP(status) ? "(core file generated)" : "");
#else
"");
#endif
} else if (WIFSTOPPED(status)){
printf("child stopped, signal number = %d\n", WSTOPSIG(status));
}
}

/*
struct tms {
clock_t tms_utime; // user CPU time
clock_t tms_stime; // system CPU time
clock_t tms_cutime; // user CPU time, terminated children
clock_t tms_sutime; // system CPU time, terminated children
}
*/

void pr_times(clock_t real, struct tms *tmsstart, struct tms *tmsend) {
static long clktck = 0;
if (clktck == 0) {
if ((clktck = sysconf(_SC_CLK_TCK)) < 0) {
perror("sysconf error");
exit(-1);
}
}

printf(" real: %7.2f\n", real / (double)clktck);
printf(" user: %7.2f\n", (tmsend -> tms_utime - tmsstart -> tms_utime) / (double)clktck);
printf(" sys: %7.2f\n", (tmsend -> tms_stime - tmsstart -> tms_stime) / (double)clktck);
printf(" child user: %7.2f\n", (tmsend -> tms_cutime - tmsstart -> tms_cutime) / (double)clktck);
printf(" child sys: %7.2f\n", (tmsend -> tms_cstime - tmsstart -> tms_cstime) / (double)clktck);
}

void do_cmd(char *cmd) {
struct tms tmsstart, tmsend;
clock_t start, end;
int status;

printf("\nCommand: %s\n", cmd);

if ((start = times(&tmsstart)) == -1) {
perror("times error");
exit(-1);
}

if ((status = system(cmd)) < 0) {
perror("system() error");
exit(-1);
}

if ((end = times(&tmsend)) == -1) {
perror("times error");
exit(-1);
}
pr_times(end - start, &tmsstart, &tmsend);
pr_exit(status);
}

输入与输出:

1
$ ./a.out "sleep 5" "date" "man bash > /dev/null"

Command: sleep 5
  real:     5.02
  user:     0.00
  sys:     0.00
  child user:     0.00
  child sys:     0.00
normal termination, exit status = 0

Command: date
Thu Oct 20 23:58:06 CST 2016
  real:     0.02
  user:     0.00
  sys:     0.00
  child user:     0.00
  child sys:     0.00
normal termination, exit status = 0

Command: man bash > /dev/null
  real:     0.24
  user:     0.00
  sys:     0.00
  child user:     0.28
  child sys:     0.07
normal termination, exit status = 0
Zach的博客

libev源码浅析

| 阅读次数

libev

libev是一个高效的异步I/O库,采用了事件循环模型。用户向libev注册感兴趣的事件,如文件描述符可读等,当事件发生时,用户注册事件时的回调被调用。

libev支持的事件有:

  1. 文件描述符事件(描述符可读、可写),ev_io
  2. Linux的inotify接口,ev_stat
  3. 信号事件,ev_signal
  4. 定时事件,ev_timer
  5. 周期事件,ev_periodic
  6. 进程状态变化,ev_child
  7. 事件循环自身的事件,ev_idle,ev_prepare和ev_check

一个例子

我们先看一个很简单的例子,然后用这个例子的执行流程去分析libev源码。

1
2
3
4
5
6
7
8
9
10
11
12
13
14
15
16
17
18
19
20
21
22
23
24
25
26
27
28
29
30
31
#include <stdio.h>
#include <unistd.h>

#include <ev.h>

ev_io stdin_watcher;

static void stdin_cb(EV_P_ ev_io *w, int revents) {
char buf[128];
int n;
if (revents & EV_READ) {
n = read(w -> fd, buf, 128);
if (n == 0) {
fprintf(stderr, "End of File\n");
ev_io_stop(EV_A_ w);
} else if (n > 0){
printf("read: %s\n", buf);
}
}
}

int main(void) {
struct ev_loop *loop = EV_DEFAULT;

ev_io_init(&stdin_watcher, stdin_cb, 0, EV_READ);
ev_io_start(loop, &stdin_watcher);

ev_run(loop, 0);

return 0;
}

libev中一个事件有一个watcher表示,一个watcher的类型的格式为ev_TYPE。

每一个watcher有对应的初始化函数ev_TYPE_init,以ev_io为例,它的初始化函数原型为:

1
2
3
void ev_io_init(ev_io * w, void (*cb)(EV_P int revents), int fd, int events);

#define EV_P struct ev_loop *loop,

注:注意的一点是,在libev的实现中,ev_io_init实际上是一个宏,但是我们把它理解成一个函数其实区别并不大。

ev_io_init内部调用了两个函数:

1
2
3
void ev_init(ev_watcher *w, void (*cb)(EV_P int revents));

void ev_io_set(ev_io *w, int fd, int events);

在初始化之后就调用ev_io_start在loop中注册事件,最后调用ev_run运行loop。

当标准输入可读时,我们注册的回调模块stdin_watcher会被调用,这时候我们就可以读取标准输入的数据,如果读到了EOF,那么就调用ev_io_stop停止这个监听事件。

源码分析

数据结构

以下的代码都是以2.0版本为准的。
在分析源码之前,我们先来看看libev中几个关键的数据结构。

EV_WATCHER

1
2
3
4
5
6
7
struct ev_watcher {
int active;
int pending;
int priority;
EV_COMMON /* void *data */
void (*cb)(EV_P struct ev_TYPE *w, int revents);
}

ev_watcher相当于所有watcher的父类,它含有所有watcher的通用数据。拿ev_io来说,它的结构如下:

1
2
3
4
5
6
7
8
9
10
11
12
struct ev_io {
int active;
int pending;
int priority;
EV_COMMON
void (*cb)(EV_P struct ev_TYPE *w int revents);


struct ev_watcher_list *next;

int fd;
int events;
}

可以看到一个ev_io指针可以转换成一个ev_watcher指针,其他watcher类型也可以这么操作,所以ev_watcher相当于所有watcher的父类。

ANFD

1
2
3
4
5
6
7
struct ANFD {
WL head;
unsigned char events;
unsigned char reify;
}

typedef ev_watcher_list* WL;

ANFD表示一个文件描述符对应的事件。一个文件描述符可以有多个watcher,它们以链表的形式被组织起来,head即是链表的头。在ev_loop结构中,有一个anfds数组,每一个数组元素即数组下标对应的文件描述符的ANFD。

ANPENDING

1
2
3
4
5
6
struct ANPENDING {
W w;
int events;
}

typedef ev_watcher* W;

一个ANPENDING即一个待处理的事件。在ev_loop中,待处理的事件的组织形式如下所示:

1
pri_max |----|     |----|----|----|----|----|
        |  --|---> |    |    |    |    |    |
   .    |----|     |----|----|----|----|----|
   .    |    |			ANPENDINGS
   .    |----|    
        |    |
        |----|
        |    |		pendings[w->priority][w->pending]即对应watcher的ANPENDING
        |----|
        |    |
        |----|
        |    |
pri_min |----|

ev_loop中每一个ANPENDING都有一个优先级,高优先级的事件在一个事件循环中首先被处理,但是低优先级事件也一定会被执行,只不过执行被延后了而已。

EV_LOOP

1
2
3
4
5
6
7
8
9
10
11
12
13
14
15
16
17
18
19
20
21
22
23
24
25
26
27
28
29
30
31
32
33
34
35
36
37
38
39
40
41
42
43
44
struct ev_loop {
ev_tstamp ev_rt_now;
int activent;
int loop_count;
void (*backend_modify)(EV_P int fd, int oev, int nev);
void (*backend_poll)(EV_P ev_tstamp timeout);
int backend_fd;

struct epoll_event *epoll_events; /* epoll for example */
int epoll_eventmax;

ANFD *anfds;
int anfdmax;

ANPENDING *pendings[NUMPRI];
int pendingmax[NUMPRI];
int pendingcnt[NUMPRI];

int *fdchanges;
int fdchangemax;
int fdchangecnt;

WT *timers;
int timermax;
int timercnt;

WT *periodics;
int periodicmax;
int periodiccnt;

ev_idle **idles[NUMPRI];
int idlemax[NUMPRI];
int idlecnt[NUMPRI];

ev_prepare **prepares;
int preparemax;
int preparecnt;

ev_check **checks;
int checkmax;
int checkcnt;

...
}

ev_loop显然是libev中最重要的结构,这里只列出部分元素的含义,其余部分等在分析对应源码时再作解释。

  • ev_rt_now:用于记录ev_loop的现在时间。libev中的计时器是基于真实时间的,如果你注册了一个超时事件,事件在一小时之后发生,之后你把系统时间设置成去年的某个事件,注册的事件也会在大约一小时后发生。
  • activent:watcher必须保持ev_loop存活,这样每当一个事件发生时,watcher的回调函数才能被执行。为了保持ev_loop存活,watcher必须调用ev_ref 增加activent的个数,若activent值为0,那么这一次事件循环之后,ev_loop就被摧毁了。
  • loop_count:记录了ev_loop事件迭代的次数
  • backend_modify:ev_loop添加或修改事件监听的接口,依平台而定。libev支持的接口有
    • select
    • poll
    • epoll
    • kqueue
    • port
  • backend_poll:ev_loop调用平台相关接口监听相关事件的接口。
  • backend_fd:以epoll为例,其值为我们调用epoll_create接口创建的文件句柄。

ev_io

首先来看一下ev_io的执行流程

ev_io_start

1
2
3
4
5
6
7
8
9
10
11
12
13
14
15
16
17
18
19
20
21
22
23
24
25
26
27
28
29
30
31
32
33
34
35
36
37
38
39
40
41
42
43
44
45
46
void noinline
ev_io_start (EV_P_ ev_io *w)
{

int fd = w->fd;

if (expect_false (ev_is_active (w)))
return;

assert (("ev_io_start called with negative fd", fd >= 0));

ev_start (EV_A_ (W)w, 1);
array_needsize (ANFD, anfds, anfdmax, fd + 1, anfds_init);
wlist_add (&anfds[fd].head, (WL)w);

fd_change (EV_A_ fd, w->events & EV_IOFDSET | 1);
w->events &= ~EV_IOFDSET;
}

void inline_speed
ev_start (EV_P_ W w, int active)
{

pri_adjust (EV_A_ w);
w->active = active;
ev_ref (EV_A);
}

void inline_size
wlist_add (WL *head, WL elem)
{

elem->next = *head;
*head = elem;
}

void inline_size
fd_change (EV_P_ int fd, int flags)
{

unsigned char reify = anfds [fd].reify;
anfds [fd].reify |= flags;

if (expect_true (!reify))
{
++fdchangecnt;
array_needsize (int, fdchanges, fdchangemax, fdchangecnt, EMPTY2);
fdchanges [fdchangecnt - 1] = fd;
}
}

主要步骤为:

  1. 执行ev_start,调整watcher的优先级,设置watcher的active标志同增加ev_loop的activent。
  2. 在文件描述符对应的watcher链表中插入该ev_io。
  3. 调用fd_change,它增加fdchangecnt的个数,同时记录发生变化的文件描述符,以便在事件循环的时候处理它。

ev_loop

在最新版本中ev_loop对应的函数为ev_run,由于我看的是2.0版本的,就用ev_loop来说明了。

ev_loop
1
2
3
4
5
6
7
8
9
10
11
12
13
14
15
16
17
18
19
20
21
22
23
24
25
26
27
28
29
30
31
32
33
34
35
36
37
38
39
40
41
42
43
44
45
46
47
48
49
50
51
52
53
54
55
56
57
58
59
60
61
62
63
64
65
66
67
68
69
70
71
72
73
74
75
76
77
78
79
80
81
82
83
84
85
86
87
88
89
90
91
92
93
94
95
96
97
98
99
100
101
102
103
104
105
106
107
108
void
ev_loop (EV_P_ int flags)
{

loop_done = flags & (EVLOOP_ONESHOT | EVLOOP_NONBLOCK)
? EVUNLOOP_ONE
: EVUNLOOP_CANCEL;

call_pending (EV_A); /* in case we recurse, ensure ordering stays nice and clean */

do
{
#ifndef _WIN32
if (expect_false (curpid)) /* penalise the forking check even more */
if (expect_false (getpid () != curpid))
{
curpid = getpid ();
postfork = 1;
}
#endif

#if EV_FORK_ENABLE
/* we might have forked, so queue fork handlers */
if (expect_false (postfork))
if (forkcnt)
{
queue_events (EV_A_ (W *)forks, forkcnt, EV_FORK);
call_pending (EV_A);
}
#endif

/* queue prepare watchers (and execute them) */
if (expect_false (preparecnt))
{
queue_events (EV_A_ (W *)prepares, preparecnt, EV_PREPARE);
call_pending (EV_A);
}

if (expect_false (!activecnt)) /* A */
break;

/* we might have forked, so reify kernel state if necessary */
if (expect_false (postfork))
loop_fork (EV_A);

/* update fd-related kernel structures */
fd_reify (EV_A); /* B */

/* calculate blocking time */
{
ev_tstamp block;

if (expect_false (flags & EVLOOP_NONBLOCK || idleall || !activecnt))
block = 0.; /* do not block at all */
else
{
/* update time to cancel out callback processing overhead */
time_update (EV_A_ 1e100);

block = MAX_BLOCKTIME;

if (timercnt)
{
ev_tstamp to = ((WT)timers [0])->at - mn_now + backend_fudge;
if (block > to) block = to;
}

#if EV_PERIODIC_ENABLE
if (periodiccnt)
{
ev_tstamp to = ((WT)periodics [0])->at - ev_rt_now + backend_fudge;
if (block > to) block = to;
}
#endif

if (expect_false (block < 0.)) block = 0.;
}

/* C */
++loop_count;
backend_poll (EV_A_ block);

/* update ev_rt_now, do magic */
time_update (EV_A_ block);
}

/* queue pending timers and reschedule them */
timers_reify (EV_A); /* relative timers called last */
#if EV_PERIODIC_ENABLE
periodics_reify (EV_A); /* absolute timers called first */
#endif

#if EV_IDLE_ENABLE
/* queue idle watchers unless other events are pending */
idle_reify (EV_A);
#endif

/* queue check watchers, to be executed first */
if (expect_false (checkcnt))
queue_events (EV_A_ (W *)checks, checkcnt, EV_CHECK);

call_pending (EV_A); /* E */

}
while (expect_true (activecnt && !loop_done));

if (loop_done == EVUNLOOP_ONE)
loop_done = EVUNLOOP_CANCEL;
}
fd_reify
1
2
3
4
5
6
7
8
9
10
11
12
13
14
15
16
17
18
19
20
21
22
23
24
25
26
27
28
29
30
31
32
33
34
35
36
37
38
39
void inline_size
fd_reify (EV_P)
{

int i;

for (i = 0; i < fdchangecnt; ++i)
{
int fd = fdchanges [i];
ANFD *anfd = anfds + fd;
ev_io *w;

unsigned char events = 0;

for (w = (ev_io *)anfd->head; w; w = (ev_io *)((WL)w)->next)
events |= (unsigned char)w->events;

#if EV_SELECT_IS_WINSOCKET
if (events)
{
unsigned long argp;
anfd->handle = _get_osfhandle (fd);
assert (("libev only supports socket fds in this configuration", ioctlsocket (anfd->handle, FIONREAD, &argp) == 0));
}
#endif

{
unsigned char o_events = anfd->events;
unsigned char o_reify = anfd->reify;

anfd->reify = 0;
anfd->events = events;

if (o_events != events || o_reify & EV_IOFDSET)
backend_modify (EV_A_ fd, o_events, events);
}
}

fdchangecnt = 0;
}
epoll_poll
1
2
3
4
5
6
7
8
9
10
11
12
13
14
15
16
17
18
19
20
21
22
23
24
25
26
27
28
29
30
31
32
33
34
35
36
37
38
39
40
41
42
43
44
static void
epoll_poll (EV_P_ ev_tstamp timeout)
{

/* D */
int i;
int eventcnt = epoll_wait (backend_fd, epoll_events, epoll_eventmax, (int)ceil (timeout * 1000.));

if (expect_false (eventcnt < 0))
{
if (errno != EINTR)
syserr ("(libev) epoll_wait");

return;
}

for (i = 0; i < eventcnt; ++i)
{
struct epoll_event *ev = epoll_events + i;

int fd = ev->data.u64;
int got = (ev->events & (EPOLLOUT | EPOLLERR | EPOLLHUP) ? EV_WRITE : 0)
| (ev->events & (EPOLLIN | EPOLLERR | EPOLLHUP) ? EV_READ : 0);
int want = anfds [fd].events;

if (expect_false (got & ~want))
{
/* we received an event but are not interested in it, try mod or del */
ev->events = (want & EV_READ ? EPOLLIN : 0)
| (want & EV_WRITE ? EPOLLOUT : 0);

epoll_ctl (backend_fd, want ? EPOLL_CTL_MOD : EPOLL_CTL_DEL, fd, ev);
}

fd_event (EV_A_ fd, got);
}

/* if the receive array was full, increase its size */
if (expect_false (eventcnt == epoll_eventmax))
{
ev_free (epoll_events);
epoll_eventmax = array_nextsize (sizeof (struct epoll_event), epoll_eventmax, epoll_eventmax + 1);
epoll_events = (struct epoll_event *)ev_malloc (sizeof (struct epoll_event) * epoll_eventmax);
}
}
call_pending
1
2
3
4
5
6
7
8
9
10
11
12
13
14
15
16
17
18
19
void inline_speed
call_pending (EV_P)
{

int pri;

for (pri = NUMPRI; pri--; )
while (pendingcnt [pri])
{
ANPENDING *p = pendings [pri] + --pendingcnt [pri];

if (expect_true (p->w))
{
/*assert (("non-pending watcher on pending list", p->w->pending));*/

p->w->pending = 0;
EV_CB_INVOKE (p->w, p->events);
}
}
}

主体部分就在do {} while这个循环里面。

我们先略过不和ev_io相关的部分,只看代码中标注([A-E])位置对应的部分:

  • A:检查activent值是否为0,若是,那么loop退出事件循环
  • B:调用fd_reify函数,该函数遍历fdchanges数组,对于每一个描述符,如果其对应的事件有改变或者新增加的描述符,那么就调用backend_modify修改或添加文件描述符的事件。
  • C:增加事件循环的迭代次数,然后调用backend_poll调用相关平台的接口监听文件描述符事件。
  • D:以epoll为例,backend_poll的实现为epoll_poll。epoll_poll调用epoll_wait,发生的事件被存放在epoll_events数组中,对于一个事件,得到的事件不是我们想要的事件,那么就修改或删除文件描述符对应的监听事件。然后调用fd_event函数,把得到文件描述符事件加到ev_loop的对应的pendings列表中。在fd_event之后,如果发现epoll_eventmax == eventcnt,那么就增大epoll_events数组元素的个数,以便下一次能够接收更多发生的文件描述符事件。
  • E:调用call_pending函数:
    1. 按照优先级从大到小,遍历pendings数组
    2. 如果对应的pendingcnt[pri]值大于0,即对应优先级有事件待处理,依次去对应ANPENDING列表的元素
    3. 对取到的ANPENDING,用EV_CB_INVOKE宏调用其对应watcher的回调函数。

ev_io_stop

1
2
3
4
5
6
7
8
9
10
11
12
13
14
15
16
17
18
void noinline
ev_io_stop (EV_P_ ev_io *w)
{

/* A */
clear_pending (EV_A_ (W)w);
if (expect_false (!ev_is_active (w)))
return;

assert (("ev_io_start called with illegal fd (must stay constant after start!)", w->fd >= 0 && w->fd < anfdmax));

/* B */
wlist_del (&anfds[w->fd].head, (WL)w);
/* C */
ev_stop (EV_A_ (W)w);

/* D */
fd_change (EV_A_ w->fd, 1);
}
clear_pending
1
2
3
4
5
6
7
8
9
void inline_speed
clear_pending (EV_P_ W w)
{

if (w->pending)
{
pendings [ABSPRI (w)][w->pending - 1].w = 0;
w->pending = 0;
}
}
ev_stop
1
2
3
4
5
6
void inline_size
ev_stop (EV_P_ W w)
{

ev_unref (EV_A);
w->active = 0;
}
  • A:从pendings列表中删除对应的watcher
  • B:从文件描述符对应的watcher链表anfds[w->fd]中删除将被停止的watcher。
  • C:调用ev_stop,减少ev_loop中activent的个数(通过ev_unref实现),讲watcher的active标志置为0。
  • D:调用fd_change函数修改对应的fdchanges数组和fdchangecnt变量,以便在下一次事件循环中修改文件描述符的监听事件。如果文件描述符没有任何监听事件,那么在文件描述符的epoll事件会在epoll_poll函数中被删除。
1
2
3
4
5
6
7
8
if (expect_false (got & ~want))
{
/* we received an event but are not interested in it, try mod or del */
ev->events = (want & EV_READ ? EPOLLIN : 0)
| (want & EV_WRITE ? EPOLLOUT : 0);

epoll_ctl (backend_fd, want ? EPOLL_CTL_MOD : EPOLL_CTL_DEL, fd, ev);
}

ev_timer & ev_periodic

ev_timer和ev_periodic都可以用来设置超时和周期事件,不同的是,ev_periodic可以设置一个回调函数,在每一次周期完成后这个回调函数被调用并返回一个时间节点,该节点是下一次事件被触发的时间。

ev_loop结构内有两个元素:

  • timers
  • periodics

timer和periodic的结构分别为:

timer
1
2
3
4
5
struct ev_timer {
EV_WATCHER(ev_timer)
ev_tstamp at;
ev_tstamp repeat; /* 多少时间后重复执行*/
}
periodic
1
2
3
4
5
6
struct ev_periodic {
EV_WATCHER(ev_periodic)
ev_tstamp offset;
ev_tstamp interval;
ev_tstamp (*reschedule_cb)(struct ev_periodic *w, ev_tstamp now);
}

它们分别存储了在ev_loop中注册的所有ev_timer和ev_periodic。它们都以最小堆的形式被组织,堆顶是离现在最近的timer事件。每一次事件循环,在调用backend_poll之前,首先取两个堆顶的元素,取时间较小的那个作为此次backend_poll的超时事件。在backend_poll返回之后调用timers_reify和periodics_reify调整堆,同时把已经发生的超时和定时事件加入到pendings中。

1
2
3
4
5
6
7
8
9
10
11
12
13
14
15
16
17
18
19
20
21
22
23
24
25
26
27
28
29
30
31
32
33
34
35
36
37
38
        if (expect_false (flags & EVLOOP_NONBLOCK || idleall || !activecnt))
block = 0.; /* do not block at all */
else
{
/* update time to cancel out callback processing overhead */
time_update (EV_A_ 1e100);

block = MAX_BLOCKTIME;

if (timercnt)
{
ev_tstamp to = ((WT)timers [0])->at - mn_now + backend_fudge;
if (block > to) block = to;
}

#if EV_PERIODIC_ENABLE
if (periodiccnt)
{
ev_tstamp to = ((WT)periodics [0])->at - ev_rt_now + backend_fudge;
if (block > to) block = to;
}
#endif

if (expect_false (block < 0.)) block = 0.;
}

++loop_count;
backend_poll (EV_A_ block);

/* update ev_rt_now, do magic */
time_update (EV_A_ block);
}

/* queue pending timers and reschedule them */
timers_reify (EV_A); /* relative timers called last */
#if EV_PERIODIC_ENABLE
periodics_reify (EV_A); /* absolute timers called first */
#endif
  • time_update:主要用于更新ev_loop的当前时间。
  • backend_fudge:时间误差变量

time_reify和periodic_reify函数如下:

1
2
3
4
5
6
7
8
9
10
11
12
13
14
15
16
17
18
19
20
21
22
23
24
25
26
27
28
29
30
31
32
33
34
35
36
37
38
39
40
41
42
43
44
45
46
47
48
49
50
51
52
53
54
55
56
57
58
void inline_size
timers_reify (EV_P)
{

while (timercnt && ((WT)timers [0])->at <= mn_now)
{
ev_timer *w = (ev_timer *)timers [0];

/*assert (("inactive timer on timer heap detected", ev_is_active (w)));*/

/* first reschedule or stop timer */
if (w->repeat)
{
assert (("negative ev_timer repeat value found while processing timers", w->repeat > 0.));

((WT)w)->at += w->repeat;
if (((WT)w)->at < mn_now)
((WT)w)->at = mn_now;

downheap (timers, timercnt, 0);
}
else
ev_timer_stop (EV_A_ w); /* nonrepeating: stop timer */

ev_feed_event (EV_A_ (W)w, EV_TIMEOUT);
}
}

void inline_size
periodics_reify (EV_P)
{

/* A */
while (periodiccnt && ((WT)periodics [0])->at <= ev_rt_now)
{
ev_periodic *w = (ev_periodic *)periodics [0];

/*assert (("inactive timer on periodic heap detected", ev_is_active (w)));*/

/* first reschedule or stop timer */
/* B */
if (w->reschedule_cb)
{
((WT)w)->at = w->reschedule_cb (w, ev_rt_now + TIME_EPSILON);
assert (("ev_periodic reschedule callback returned time in the past", ((WT)w)->at > ev_rt_now));
downheap (periodics, periodiccnt, 0);
}
else if (w->interval)
{
((WT)w)->at = w->offset + ceil ((ev_rt_now - w->offset) / w->interval) * w->interval;
if (((WT)w)->at - ev_rt_now <= TIME_EPSILON) ((WT)w)->at += w->interval;
assert (("ev_periodic timeout in the past detected while processing timers, negative interval?", ((WT)w)->at > ev_rt_now));
downheap (periodics, periodiccnt, 0);
}
else
ev_periodic_stop (EV_A_ w); /* nonrepeating: stop timer */

ev_feed_event (EV_A_ (W)w, EV_PERIODIC);
}
}

以periodics_reify例子(timers_reify类似):

  1. 如果堆顶的时间比现在的事件小,那么取堆顶,否则函数返回
  2. 如果是周期事件,即reschedule_cb不为空或者interval不为0,那么计算出下一次事件触发的事件,调整堆,否则停止这个timer事件。
  3. 把这一次触发的事件加入到pendings中,等待call_pending被调用而触发回调函数。

ev_signal

libev加入了对信号事件的支持。当一个信号发生时,回调函数不会像在UNIX系统中一样被立刻调用,而是在下一个事件循环中被处理。

先看看信号事件在libev中的组织形式。

1
     |--------|     |----|----|----|----|----|
     | head   |---> |    |    |    |    |    |
.    |        |     |----|----|----|----|----|
.    | gotsig |			EV_WATCHERS
.    |--------|    
     |        |
     |        |
     |        |	
     |--------|
     |        |
     |        |
     |        |
     |--------|

相关的数据结构:

1
2
3
4
struct ANSIG {
WL *head;
sig_atomic_t volatile gotsig;
}

当某一个信号被触发时,信号对应的WL中所有的回调函数都会被依次执行。

libev利用管道实现了异步信号处理。一个loop在调用loop_init初始化之后,调用siginit:

1
2
3
4
5
6
7
8
9
10
static void noinline
siginit (EV_P)
{

fd_intern (sigpipe [0]);
fd_intern (sigpipe [1]);

ev_io_set (&sigev, sigpipe [0], EV_READ);
ev_io_start (EV_A_ &sigev);
ev_unref (EV_A); /* child watcher should not keep loop alive */
}

可以看siginit往loop中注册一个ev_io,用于监听管道中pipe[0]的读事件。

用户在注册一个信号事件时,调用ev_signal_init设置信号的回调处理,监听的信号值等。然后调用ev_signal_start:

1
2
3
4
5
6
7
8
9
10
11
12
13
14
15
16
17
...  
ev_start (EV_A_ (W)w, 1);
wlist_add (&signals [w->signum - 1].head, (WL)w);

if (!((WL)w)->next)
{
#if _WIN32
signal (w->signum, sighandler);
#else
struct sigaction sa;
sa.sa_handler = sighandler;
sigfillset (&sa.sa_mask);
sa.sa_flags = SA_RESTART; /* if restarting works we save one iteration */
sigaction (w->signum, &sa, 0);
#endif
}
...

首先讲watcher加入对应信号的链表,然后如果是链头,那么说明对应的信号处理函数未被注册到内核中,于是初始化一个sigaction,注册对应的信号处理函数。sighandler代码如下:

1
2
3
4
5
6
7
8
9
10
11
12
13
14
15
16
17
static void
sighandler (int signum)
{

#if _WIN32
signal (signum, sighandler);
#endif

signals [signum - 1].gotsig = 1;

if (!gotsig)
{
int old_errno = errno;
gotsig = 1;
write (sigpipe [1], &signum, 1);
errno = old_errno;
}
}

可以看到,当一个信号发生时,libev设置信号的对应gosig为1,然后往管道离写信号值,这样先前注册的读管道监视器sigev就被激活,其对应的回调函数被在下一个事件循环被调用:

1
2
3
4
5
6
7
8
9
10
11
12
static void
sigcb (EV_P_ ev_io *iow, int revents)
{

int signum;

read (sigpipe [0], &revents, 1);
gotsig = 0;

for (signum = signalmax; signum--; )
if (signals [signum].gotsig)
ev_feed_signal_event (EV_A_ signum + 1);
}

在这之后所有的信号事件被加入pendings中,当call_pending被调用时,信号事件的回调事件也就得到了处理。

ev_prepare & ev_check

ev_prepare和ev_check是ev_loop事件循环自身的事件。ev_prepare在ev_loop收集事件前被调用;ev_check在收集完事件后被调用。他们都能唤醒和休眠任意个监视器,以实现一些特定的事件循环行为。

ev_prepare和ev_check的结构为:

1
2
3
struct ev_TYPE {
EV_WATCHER(TYPE)
}

ev_stat

ev_stat相关接口没有看,因为对inotify和kqueue接口还不是很熟悉(逃

Zach的博客

进程

| 阅读次数

进程的概念

进程是一个可执行程序的实例。而程序包含了一系列的文件信息,这些信息描述了如何在运行时创建一个进程,其所包括的内容有:

  • 二进制格式标识:用于描述可执行文件格式的元信息,内核用它来解释文件中的其他信息。Linux采用ELF文件系统。
  • 机器语言指令
  • 程序入口地址
  • 数据:程序文件包含的变量初始值和程序使用的字面常量值(如字符串).
  • 符号表及重定位表
  • 共享库和动态链接库的信息
  • 其他信息,用以描述如何创建进程。

可以用一个程序创建许多个进程,反过来,许多进程运行的可以是同一个程序。从内核角度来说,进程由用户内存空间和一系列内核数据结构组成,其中用户内存空间包含了程序代码以及代码所使用的变量,而内核数据结构则用于维护进程状态信息,如进程号、虚拟内存表、进程打开的文件描述符、信号传递及处理的有关信息、当前工作目录、进程资源使用及限制和其他大量信息。

一个进程运行时的信息可以在/proc/{PID}/目录下看到。

进程内存布局

每个进程所分配的内存由许多部分组成,通常称之为段,各个段如下:

  • 文本段:包含了进程运行的程序机器语言指令。文本段具有只读属性,以防止进程通过错误指针意外修改自身指令;同时,文本段是共享的,从而可以让一份程序代码的拷贝映射到所有共享这份代码的进程中,从而让多个进程运行同一个程序。
  • 初始化数据段:包含显示初始化的全局变量和静态变量。
  • 未初始化的数据段:包含了为进程显示初始化的全局变量和静态变量,程序启动之前,系统将本段内所有内存初始化为0,该段常被成为BSS段。为初始化和初始化的变量分开存放主要是由于没有必要为未初始化的变量在文件中分配存储空间,相反,可执行文件只要记录未初始化数据段的位置及其所需要的大小,知道运行时再由程序加载器来分配空间。
  • 栈是一个动态增长和收缩的段,由栈帧组成。系统为每个当前调用的函数分配一个栈帧。栈帧中存储了函数的局部变量(即自动变量)、实参和返回值。
  • 堆是可在运行时动态进行内存分配的一块区域。堆顶称为program break。

大多数UNIX实现(包括Linux)中C语言编程环境提供了3个全局变量etext、edata、end,它们分别用来标识文本段、初始化数据段、非初始化数据段结尾处的下一个字节位置。在x86-32体系结构进程在内存中的布局如下所示:

1
虚拟内存地址(从下往上增长)
          |----------------------------------------
          |	     Kernel映射到进程虚拟内存,区域          
          |      提供了内存符号的地址。(/proc/kallsyms) (无法使用)
          |----------------------------------------
          |		argv, environ			    
          |----------------------------------------栈顶
          |		栈(向下增长)
          |----------------------------------------
          |
          |		未分配的内存(无法使用)
          |
          |----------------------------------------程序中断
          |     堆(向上增长)
          |----------------------------------------end
          |     未初始化的数据(bss)
          |----------------------------------------edata
          |     初始化的数据
          |----------------------------------------etext
          |     文本段
          |-----------------------------------------0x08048000
          |     (无法使用)
          |-----------------------------------------0x00000000

上述布局存在于虚拟内存之中。

命令行参数和环境变量

上一节的内存布局图中,argv和eviron那一部分存储了进程启动时用户输入的命令行参数和环境变量,关于命令行参数,即main函数的参数。

1
2
3
4
5
6
7
8
#include <stdio.h>

int main(int argc, char **argc) {
int i;
for (i=0; i<argc; i++)
printf("argv[%d] = %s\n", i, argv[i]);
return 0;
}

关于环境变量,每一个进程都有与之相关联的环境变量列表,其结构式字符串数组,每一个字符串以name=value形式定义。新进程在创建之时,会继承其父进程的环境变量副本,这是一种原始的进程间通信方式,却颇为有用。

关于环境变量的几个接口和变量如下:

1
2
3
4
5
6
7
8
9
10
11
12
13
#include <stdlib.h>
extern char **environ; // 全局变量,用于访问进程的环境变量,每一个以`name=value`的形式

char* getenv(const char* name); // 成功返回环境变量字符串,否则返回NULL

int putenv(char *string); // 0表示公共,否则失败。`string`为`name=value`形式

int clearenv(); // 0表示成功,否则失败

// 注意以下函数不用`name=value`形式
int setenv(const char *name, const char *value, int overwrite); // 0表示成功,-1表示失败

int unsetenv(const char *name); // 0表示成功,-1表示失败。

需要注意的是,putenv不为字符串分配一个缓冲区,它仅仅改变对应的environ数组中的对应指针,因此string参数应该是一个静态或者全局变量,而不是自动变量。

setenv会为字符串分配一个内存缓冲区,并将name和value的字符串复制到该缓冲区中,以此来创建一个新的环境变量。若overwrite值非0,那么setenv总是覆写原来的环境变量;否则,若环境变量已经存在,那么它不会改变。

clearenv仅仅是把environ置为NULL,在某些时候可能会导致内存泄漏。

一个例子:

1
2
3
4
5
6
7
8
9
10
11
12
13
14
15
16
17
18
19
20
21
22
23
24
25
26
27
28

#define _GNU_SOURCE
#include <stdio.h>
#include <stdlib.h>

#define errExit(fmt, ...) do {fprintf(stderr, fmt, ##__VA_ARGS__); perror(""); exit(-1);} while (0)
extern char **environ;

int main(int argc, char **argv) {
char **ep;

clearenv();

for (int i=1; i<argc; i++) {
if (putenv(argv[i]) != 0)
errExit("putenv: %s", argv[i]);
}

if (setenv("GREET", "Hello world", 0) == -1)
errExit("setenv");

unsetenv("BYE");

for (ep=environ; *ep!=NULL; ep++)
puts(*ep);

return 0;
}
1
ubuntu@VM-121-120-ubuntu:~/UNIX-Demos/proc_demos$ ./a.out G="HAGA"
G=HAGA
GREET=Hello world

ubuntu@VM-121-120-ubuntu:~/UNIX-Demos/proc_demos$ ./a.out G="HAGA" GREET="Hello"
G=HAGA
GREET=Hello

非局部跳转

C语言中的goto语句允许我们进行语句跳转,但是这仅仅局限在同一个函数中。虽然跳转会让我们的代码变得难以维护,看着就头大,但是有时候有这样一个语句还是能解决很大的问题的,前提是不要滥用。为了能够解决非局部跳转的问题,UNIX系统提供了两个接口:

1
2
3
4
#include <setjmp.h>

int setjump(jump_buf env); // 0表示初始化操作,非0时返回的是`longjmp`设定的`val`值
void longjmp(jump_buf env, int val);

setjmp为后续的longjmp设立了跳转目标,setjmp把当前进程环境的各种信息保存到env参数中,调用longjmp时必须指定相同的env变量,一般将env设定为全局变量。

一个例子

1
2
3
4
5
6
7
8
9
10
11
12
13
14
15
16
17
18
19
20
21
22
23
24
25
26
27
28
29
30
31
32
33
34
35
36
#include <stdio.h>
#include <setjmp.h>

static jmp_buf env;

static void f2() {
longjmp(env, 2);
}

static void f1(int argc) {
if (argc == 1)
longjmp(env, 1);
f2();
}

int main(int argc, char **argv) {
switch (setjmp(env)) {
case 0: {
printf("Calling f1() after initial setjmp()\n");
f1(argc);
break;
}
case 1: {
printf("We jumped back from f1()\n");
break;
}
case 2: {
printf("We jumped back from f2()\n");
break;
}
default:
break;
}

return 0;
}

输出:

1
ubuntu@VM-121-120-ubuntu:~/UNIX-Demos/proc_demos$ ./a.out 
Calling f1() after initial setjmp()
We jumped back from f1()

ubuntu@VM-121-120-ubuntu:~/UNIX-Demos/proc_demos$ ./a.out  ss
Calling f1() after initial setjmp()
We jumped back from f2()
1234
Zach

Zach

38 日志
17 分类
47 标签
© 2017 Zach